
Quick answer: To add an interactive 3D product viewer Shopify, create a 3D model in the glTF/GLB format. And then you face two options: either upload directly into the product media (Shopify can render GLB files natively via the web component) or create a custom viewer within the theme. Natively rendered option will only take minutes and allows rotating, zooming and augmented reality on phone devices with AR enabled.
In case you need configurators, hotspots or any branded controls, just use an open-source tag inside your theme and set the GLB file located in the Shopify media folder or CDN as a source URL. GLB files should be 5 to 15 MB and compressed via Draco/KTX2. And don’t forget about 2D backup image.
By the Pixlnexs Animation Studio team, we produce AI video and 3D content and run the marketplace at store.pixlnexs.com, so this reflects real production experience.
A 3D product viewer on Shopify lets shoppers spin, zoom and inspect a product the way they would pick it up in a store. Done well, it cuts the uncertainty that drives returns and hesitation. Done badly, it bloats your page and annoys buyers on slow connections. This guide walks through both the native Shopify path and the custom-embed path, plus the production realities we hit when prepping models for ecommerce.
What “3D product viewer” actually means on Shopify
People mean two very different things when they say they want 3D on a product page and mixing them up is the single most common mistake we see.
Interactive 3D viewer
This is a single model the shopper can orbit, zoom and (on supported phones) drop into their room with augmented reality. It answers one question: what does this object actually look like from every angle? Shopify supports this natively.
3D configurator
This lets the shopper change the product. Swap colors, materials, components or text and watch the result update live, often with price changes attached. Configurators are a bigger build and usually need an app or custom development. We cover the cost and mechanics in our companion guide on 3D configurators that boost conversions.
Most stores should start with a plain interactive viewer. It’s cheaper, faster to ship and captures most of the conversion benefit anyway.
The file format that makes this possible: glTF / GLB
Shopify’s 3D media is built on glTF 2.0, the open 3D transmission format maintained by the Khronos Group. GLB is the single-file binary version of glTF that packs geometry, textures and materials into one file and that’s the thing you upload. If your model is in OBJ, FBX, STL or a CAD format, you have to convert it to GLB first.
You can read the format spec at the Khronos Group glTF page. The practical takeaways for ecommerce:
- GLB only for native upload. glTF plus separate texture files won’t upload cleanly to Shopify media.
- PBR materials (physically based rendering) look correct under the viewer’s lighting. Models authored for offline renderers often need their materials reworked.
- Real-world scale matters for augmented reality. A chair modeled at the wrong size shows up giant or doll-sized when someone places it in a room.
Method 1: Native Shopify 3D media (the fast path)
This needs no code and works on all current Shopify themes (Online Store 2.0). Shopify renders uploaded GLB files using Google’s open-source <model-viewer> web component, which also drives the “View in your space” AR button automatically.
Step-by-step
- Open your store admin and go to Products, then select the product.
- In the Media section, click Add media (or drag and drop) and upload your
.glbfile. Max file size for 3D media is around 500 MB but for performance you want to be nowhere near that. - Wait for Shopify to process the model. It generates a thumbnail and the AR-ready version.
- Reorder media so the 3D model lands where you want it in the gallery.
- Preview the product page on desktop and on a real phone. Confirm rotate, zoom and the AR button all work.
What you get for free
- Orbit, pan and zoom controls.
- AR on iOS (USDZ is generated automatically) and on supported Android devices.
- Lazy loading so the model doesn’t block your page from loading.
- A poster image fallback for browsers that can’t render 3D.
The catch
You get Shopify’s default lighting, controls and styling. Adding hotspots, custom UI or branded environments isn’t easy without dropping to the custom-embed method below.
Method 2: Custom embed with <model-viewer> (the flexible path)
When you need control, like a specific environment map, annotation hotspots, autoplay rotation or a model hosted on your own CDN, embed the <model-viewer> web component directly in a theme section. It’s free, open-source and the same engine Shopify uses under the hood. Google documents it on Google’s developer site and at modelviewer.dev.
Outline of the approach
- Host your
.glb(and an optional.usdzfor iOS AR) either as a Shopify “File” under Settings > Files or on a CDN. - Create a new theme section or custom Liquid block.
- Load the
model-viewerscript (a single module script tag) then place the<model-viewer>element with your model URL, aposterimage,camera-controlsandarattributes. - Add hotspots with the component’s slot system if you want labeled callouts.
- Style the container with CSS and add the section to your product template in the theme editor.
Sure, there is more effort involved and you are responsible for the maintenance but it is the only way to have a viewer that matches your brand rather than the default one of the platform. One thing you should know before making such a decision: if there is a new release from Shopify of their model-viewer bundle and you use a pinned version, the viewers will act in different ways on your website.
Method 3: A third-party app
The Shopify App Store has viewer and configurator apps that handle hosting, AR and analytics for a monthly fee. They’re the right call if you have many SKUs, want a configurator without writing code or need a managed pipeline for turning photos or CAD files into models. The trade-off is recurring cost plus another script on your page. Vet any app for page-speed impact before you commit.
Comparison: which method should you use?
| Factor | Native Shopify media | Custom <model-viewer> | Third-party app |
|---|---|---|---|
| Code required | None | Liquid + HTML/CSS | None |
| Time to ship | Minutes per product | Days for the template | Hours to set up |
| Branded controls / hotspots | No | Yes | Often yes |
| Configurator support | No | With extra dev work | Usually yes |
| AR included | Yes, automatic | Yes, with USDZ | Yes |
| Ongoing cost | None | None (you maintain) | Monthly fee |
| Best for | A few hero products | Brand-specific UX | Large catalogs / configurators |
Where the 3D models come from
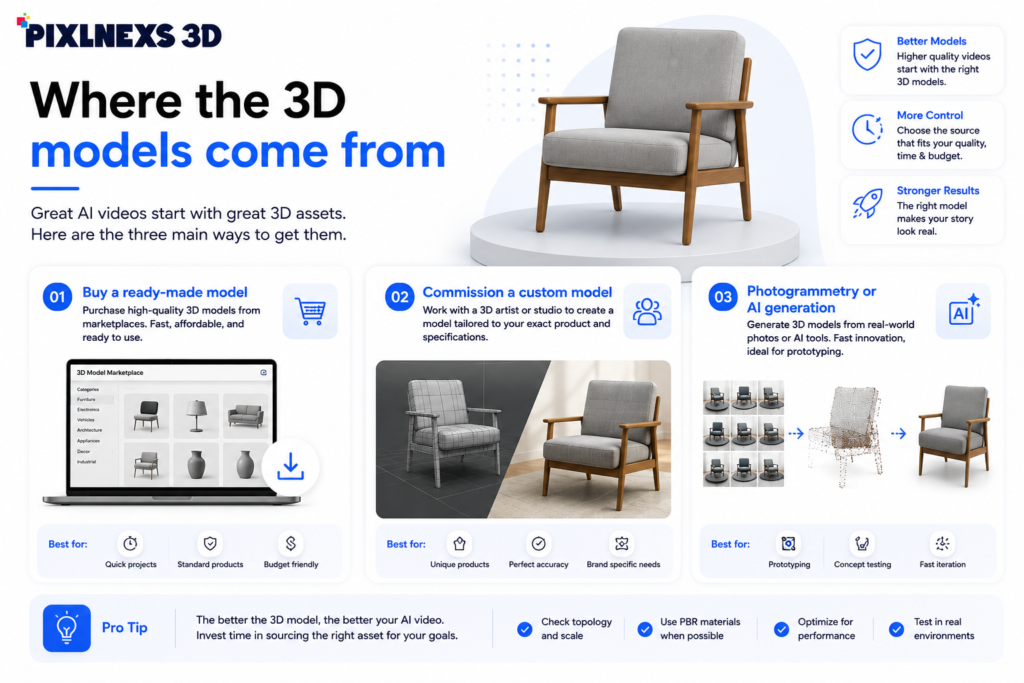
The viewer is only as good as the model inside it. You have three realistic sources:
Buy a ready-made model
For generic objects, a marketplace model is fast and cheap. Our own marketplace, store.pixlnexs.com, sells web-ready GLBs you can drop straight into Shopify. This works when the product isn’t bespoke.
Commission a custom model
For your actual SKUs, you need models built to match the real product, with correct proportions, materials and branding. This is what we do day to day and it’s the route most brands take for hero products.
Photogrammetry or AI generation
You can scan a physical object into a model or generate one from images. Quality varies and scans usually need cleanup before they’re light enough for the web but the gap is closing fast. Worth a heads-up on AI-generated meshes specifically: they often look great in a hero shot and fall apart on close inspection, with geometry that’s heavier than it needs to be and UVs that fight you during cleanup. They’re a decent starting block, rarely a finished asset.
If you sell furniture, fashion or decor, our category deep-dives cover the modeling specifics: see 3D product visualization for furniture and home decor and 3D product visualization for fashion and apparel.
Performance: the rule that keeps your store fast
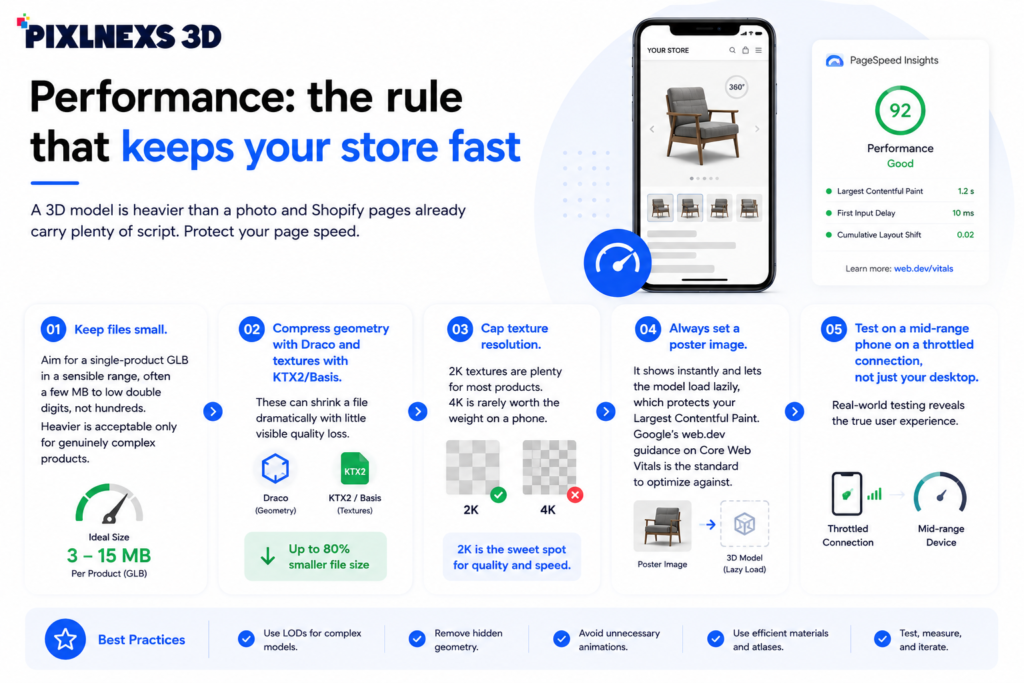
A 3D model is heavier than a photo and Shopify pages already carry plenty of script. Protect your page speed:
- Keep files small. Aim for a single-product GLB in a sensible range, often a few MB to low double digits, not hundreds. Heavier is acceptable only for genuinely complex products.
- Compress geometry with Draco and textures with KTX2/Basis. These can shrink a file dramatically with little visible quality loss.
- Cap texture resolution. 2K textures are plenty for most products. 4K is rarely worth the weight on a phone.
- Always set a poster image. It shows instantly and lets the model load lazily, which protects your Largest Contentful Paint. Google’s web.dev guidance on Core Web Vitals is the standard to optimize against.
- Test on a mid-range phone on a throttled connection, not just your desktop.
Accessibility and fallbacks
There will be some that won’t be able to use the 3D viewer, such as those using outdated web browsers or less powerful systems, as well as people relying on screen readers. It’s important to include your standard product photographs on the page in addition to the model, and always provide proper alt text in case it doesn’t load at all.
A realistic rollout plan
- Pick one hero product, your best seller or your highest-return item.
- Get one excellent GLB for it (commissioned or marketplace).
- Use native Shopify media to ship it without code.
- Measure conversion rate, time on page and return rate against a comparable product over a few weeks.
- Expand to more SKUs and only move to custom embeds or an app once the data justifies it.
Frequently asked questions
Does Shopify support 3D models natively?
Yes. On Online Store 2.0 themes you can upload GLB files directly to a product’s media and Shopify renders them with an interactive viewer, including augmented reality on supported phones. No app or code is required for the basic experience.
What file format do I need for a Shopify 3D product viewer?
GLB, the single-file binary version of glTF 2.0. If your model is in OBJ, FBX, STL or a CAD format, convert it to GLB with physically based (PBR) materials and correct real-world scale before uploading.
How big can the 3D file be?
Shopify allows large 3D files technically but for performance you should keep a single-product model well under that limit, frequently in the few-MB to low-double-digit-MB range. Compress with Draco for geometry and KTX2 for textures and cap textures around 2K for most products.
Will a 3D viewer slow down my store?
It can if you’re careless. Set a poster image so the model loads lazily, compress the file and limit texture size. With those steps the impact on Core Web Vitals is usually small. Always test on a mid-range phone over a throttled connection.
Do I need a 3D configurator or just a viewer?
If shoppers only need to inspect the product from all angles, a viewer is enough and far cheaper. If they need to change colors, materials or components and see live updates, that’s a configurator, a bigger build that usually needs an app or custom development.
How do I get a 3D model of my product?
Three options: buy a ready-made web GLB from a marketplace like store.pixlnexs.com for generic items, commission a custom model that matches your actual SKU or scan/AI-generate one. Custom modeling is the norm for hero products because accuracy and branding matter for conversion.
Does the native Shopify viewer support augmented reality?
Yes. When you upload a GLB, Shopify automatically generates the iOS USDZ version and shows a “View in your space” button on supported devices, letting shoppers place the product in their room.
Can I customize the look of the viewer?
Only a little with the native media route. You get Shopify’s default lighting and controls. For branded controls, custom environments or hotspots, embed the open-source <model-viewer> web component directly in your theme, which is the same engine Shopify uses under the hood.









Leave a Reply