
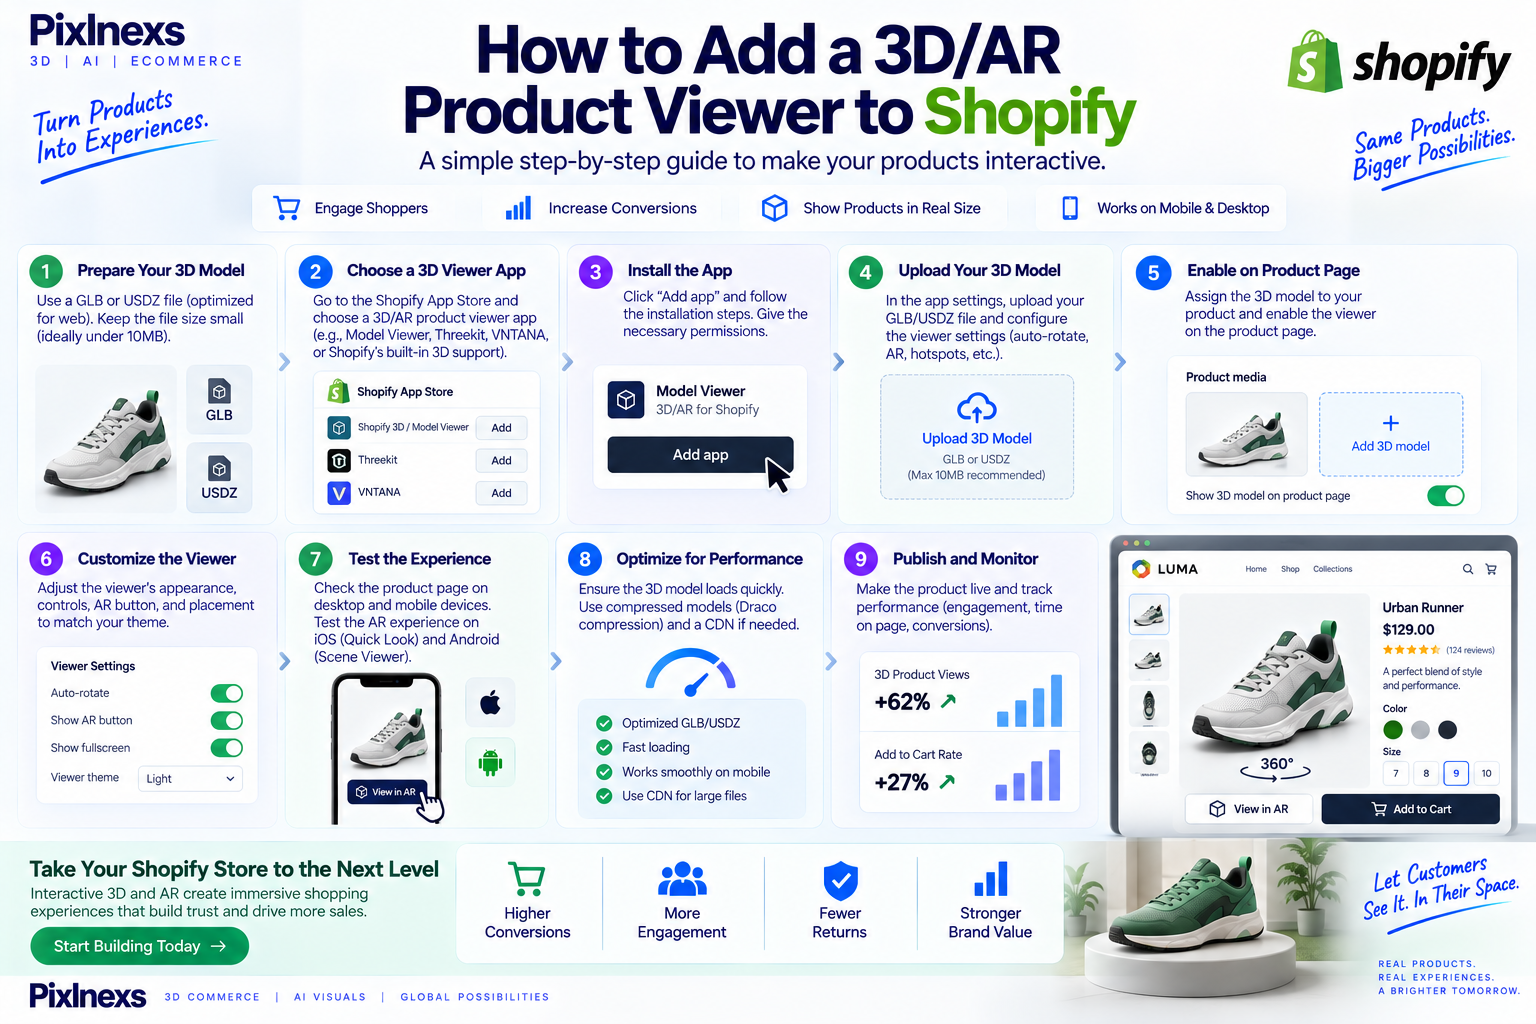
Quick answer: To add a 3D/AR product viewer to Shopify, convert your product assets into GLB format for web viewing and USDZ for mobile AR, keep the combined file size under roughly 20MB and upload them either through a theme that natively supports 3D media or through a dedicated app from the Shopify App Store. Once uploaded, test the experience on both iOS (AR Quick Look) and Android (Scene Viewer) before launch, since AR behavior differs meaningfully between the two platforms. Most stores can have a working viewer live within a day once optimized model files are ready.
By Bali Balaji, Pixlnexs Studio. Pixlnexs provides interactive 3D and AR product visualization for eCommerce brands worldwide, including hands-on Shopify integration work for merchants who want a 3D/AR viewer live without hiring a developer for every step.
Key Takeaways
- Shopify’s native 3D support centers on two file formats: GLB for the web viewer and USDZ for iOS AR.
- File size and mesh optimization are the most common reasons a 3D/AR viewer feels slow or breaks on mobile.
- Not every Shopify theme has native 3D support built in check compatibility before assuming a simple upload will work.
- Testing on real iOS and Android hardware, not just desktop, is a required step, not an optional one.
- A numbered, repeatable checklist reduces the most common setup mistakes teams make on their first 3D/AR product.
What a 3D/AR Product Viewer Does on a Shopify Store
A 3D/AR product viewer replaces (or supplements) a static image gallery with a model the shopper can rotate, zoom into and where AR is available place directly into their own physical space using their phone’s camera. Instead of imagining how large a chair is or what a shoe looks like from underneath, the shopper manipulates the actual geometry of the product.
The AR half of this experience uses the device’s native AR framework. On iOS, tapping an AR button hands the model off to Apple’s AR Quick Look. On Android, the equivalent handoff goes to Google’s Scene Viewer. Both use the phone’s camera and motion sensors to detect a flat surface a floor or a tabletop and anchor the 3D model to it at true-to-life scale, so a shopper can walk around a virtual sofa in their actual living room before buying it.
This is not a decorative feature. It directly addresses two of the most common reasons online shoppers hesitate before checkout: uncertainty about physical scale and uncertainty about what a product looks like from an angle a product photo never shows. For merchants selling furniture, footwear or anything with meaningful size or fit risk, a working 3D/AR viewer converts an abstract product photo into something closer to an in-store inspection.
Requirements Before You Start
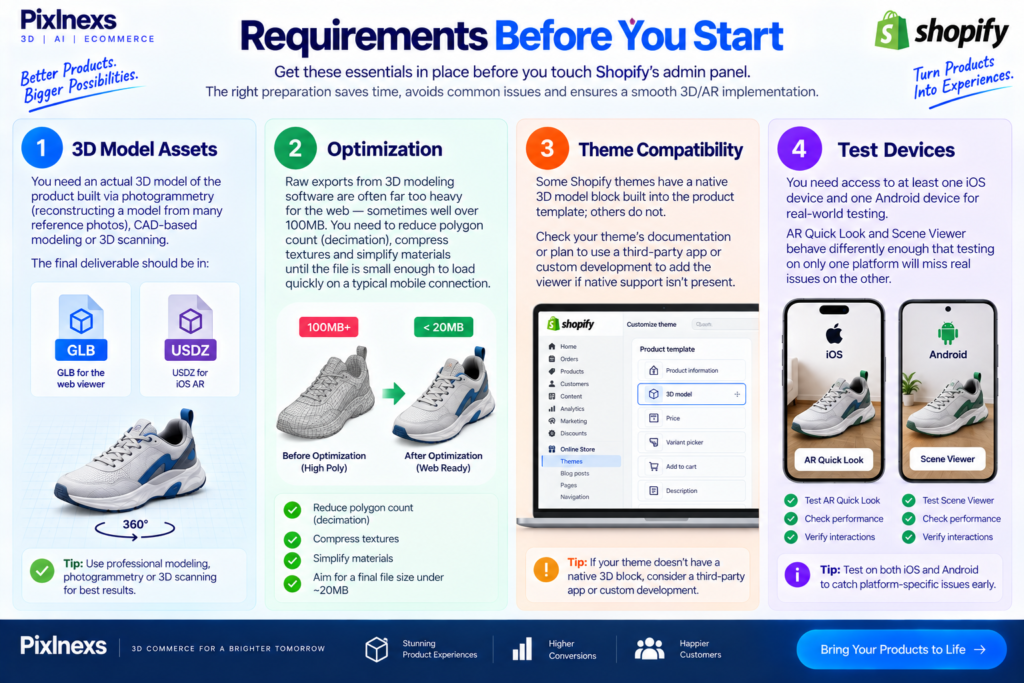
Before touching Shopify’s admin panel, confirm you have the right inputs. Skipping this step is the single biggest cause of a botched first attempt.
3D model assets. You need an actual 3D model of the product built via photogrammetry (reconstructing a model from many reference photos) CAD-based modeling or 3D scanning. Whichever method you use, the final deliverable needs to end up in GLB format for the web viewer and USDZ for iOS AR.
Optimization. Raw exports from 3D modeling software are frequently far too heavy for the web sometimes well over 100MB. You need to reduce polygon count (decimation) compress textures and simplify materials until the file is small enough to load quickly on a typical mobile connection, generally aiming to keep the finished file under roughly 20MB.
Theme compatibility. Some Shopify themes have a native 3D model block built into the product template; others do not. Check your theme’s documentation or plan to use a third-party app or custom development to add the viewer if native support isn’t present.
Test devices. You need access to at least one iOS device and one Android device for real-world testing. AR Quick Look and Scene Viewer behave differently enough that testing on only one platform will miss real issues on the other.
Numbered Setup Checklist: Adding a 3D/AR product Viewer to Shopify
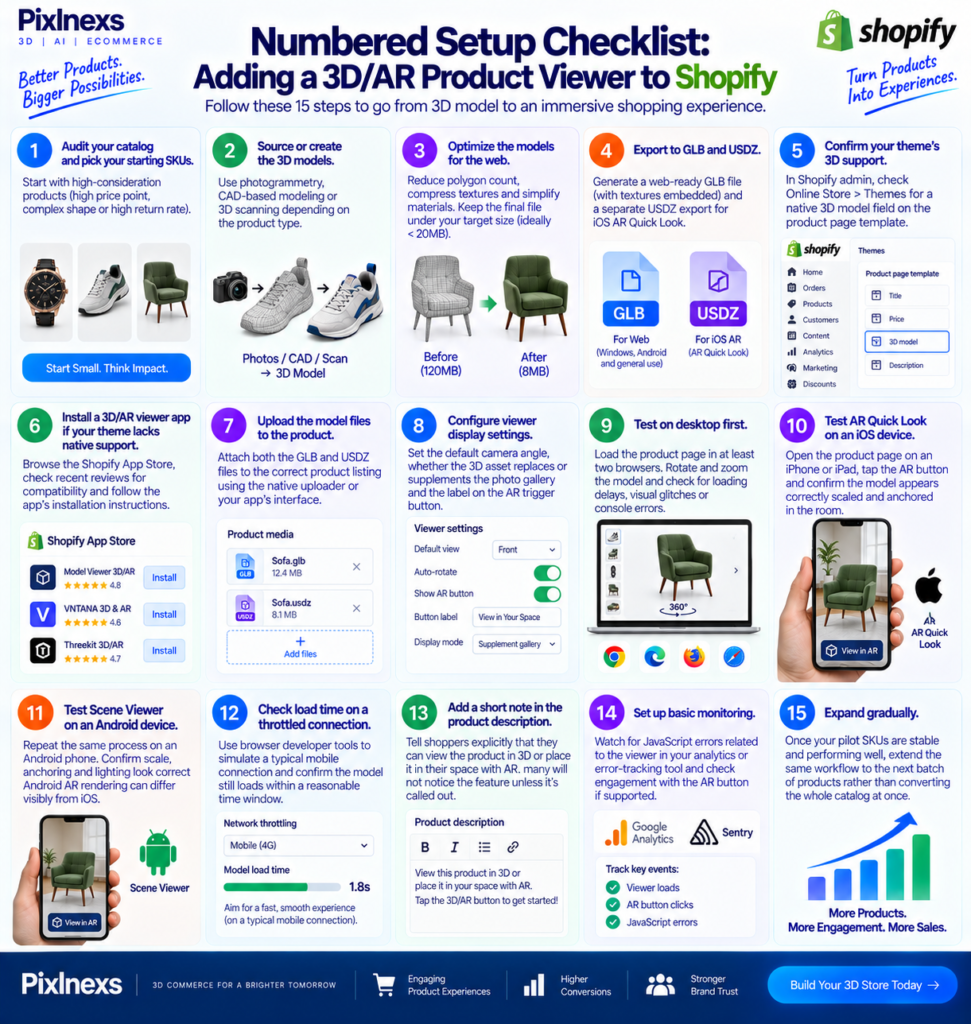
Work through these steps in order. Skipping ahead especially to the upload step before optimization is done is where most avoidable problems start.
- Audit your catalog and pick your starting SKUs. Do not attempt to convert your entire catalog on day one. Start with high-consideration products high price point, complex shape or high return rate where a 3D/AR viewer is most likely to move the needle.
- Source or create the 3D models. Use photogrammetry, CAD-based modeling or 3D scanning depending on the product type and what reference material you already have.
- Optimize the models for the web. Reduce polygon count, compress textures and simplify materials. Confirm the finished GLB file sits comfortably under your target size ceiling.
- Export to GLB and USDZ. Generate the web-ready GLB file with textures embedded and a separate USDZ export specifically for iOS AR Quick Look.
- Confirm your theme’s 3D support. In the Shopify admin, check Online Store > Themes for a native 3D model field on the product page template. If it’s missing, plan for an app or custom development instead.
- Install a 3D/AR viewer app if your theme lacks native support. Browse the Shopify App Store for a viewer app, check recent reviews for compatibility issues with your theme version and follow its specific installation instructions.
- Upload the model files to the product. Whether through the native media uploader or an app’s interface, attach both the GLB and USDZ files to the correct product listing.
- Configure viewer display settings. Set the default camera angle, whether the 3D asset replaces or supplements the photo gallery and the label on the AR trigger button so it matches your brand voice.
- Test on desktop first. Load the product page in at least two browsers. Rotate and zoom the model and check for loading delays, visual glitches or console errors.
- Test AR Quick Look on an iOS device. Open the live product page on an iPhone or iPad, tap the AR button and confirm the model appears correctly scaled and anchored in the room.
- Test Scene Viewer on an Android device. Repeat the same process on an Android phone. Confirm scale, anchoring and lighting look correct Android AR rendering can differ visibly from iOS.
- Check load time on a throttled connection. Use browser developer tools to simulate a typical mobile connection and confirm the model still loads within a reasonable time window.
- Add a short note in the product description. Tell shoppers explicitly that they can view the product in 3D or place it in their space with AR many will not notice the feature unless it’s called out.
- Set up basic monitoring. Watch for JavaScript errors related to the viewer in your analytics or error-tracking tool after launch and check engagement with the AR button if your app or analytics setup supports it.
- Expand gradually. Once your pilot SKUs are stable and performing well, extend the same workflow to the next batch of products rather than converting the whole catalog at once.
Shopify Native AR Support vs Third-Party Viewer Apps
| Approach | Setup Effort | AR Compatibility | Customization |
|---|---|---|---|
| Shopify native (theme-supported) | Low upload files, no extra install | High, on themes that support it | Low limited control over viewer UI |
| Third-party app | Medium install, configure, test | High, provided the app is actively maintained | Medium most apps offer some styling and behavior options |
| Custom development | High requires a developer | High, fully controllable | High full control over UI, behavior and integration with other tools |
Native support is the simplest path when your theme already includes it: you upload GLB and USDZ files and the viewer appears automatically. The tradeoff is limited customization you generally cannot restyle the viewer or add custom interaction logic.
Third-party apps fill the gap for themes without native support and often add features native support lacks, like analytics on viewer engagement or configurator functionality. The tradeoff is an added monthly cost and a dependency on the app developer keeping it updated as Shopify’s platform evolves.
Custom development gives full control useful for brands with a distinctive product experience in mind but requires ongoing developer involvement for maintenance and Shopify platform updates.
In our integration work, we typically start by checking native theme support first, since it is the lowest-maintenance long-term option when it is available and sufficient for the brand’s needs. We only recommend a third-party app or custom build when native support is missing entirely or when a client has a specific customization requirement like a branded viewer UI or an integrated color configurator that native support cannot deliver.
File Formats Shopify Supports for 3D/AR
GLB (binary glTF) is the standard format for the web-based 3D viewer. It packages geometry, materials and textures into a single compact binary file that Shopify’s viewer renders using WebGL in the browser.
USDZ is the format Apple’s AR Quick Look requires. It is a separate export from GLB, built specifically for iOS’s AR pipeline and is not used for the desktop or in-browser 3D view.
Android’s Scene Viewer, by contrast, generally works from the same GLB/GLTF file used for web viewing, rather than requiring its own separate export one of several small but important platform differences worth confirming with your specific viewer app or theme documentation, since implementation details can shift as Shopify and the underlying AR standards evolve.
If your existing 3D assets are in other formats OBJ, FBX or STL they need to be converted before use. Conversion tools exist within common 3D software packages but conversion quality varies and a poorly converted file is a common source of texture or scale errors after upload. For authoritative background on Shopify’s own approach to 3D and media, Shopify’s developer documentation at shopify.dev is the primary reference worth consulting directly, since platform specifics do change over time.
Testing Your Viewer Before Launch
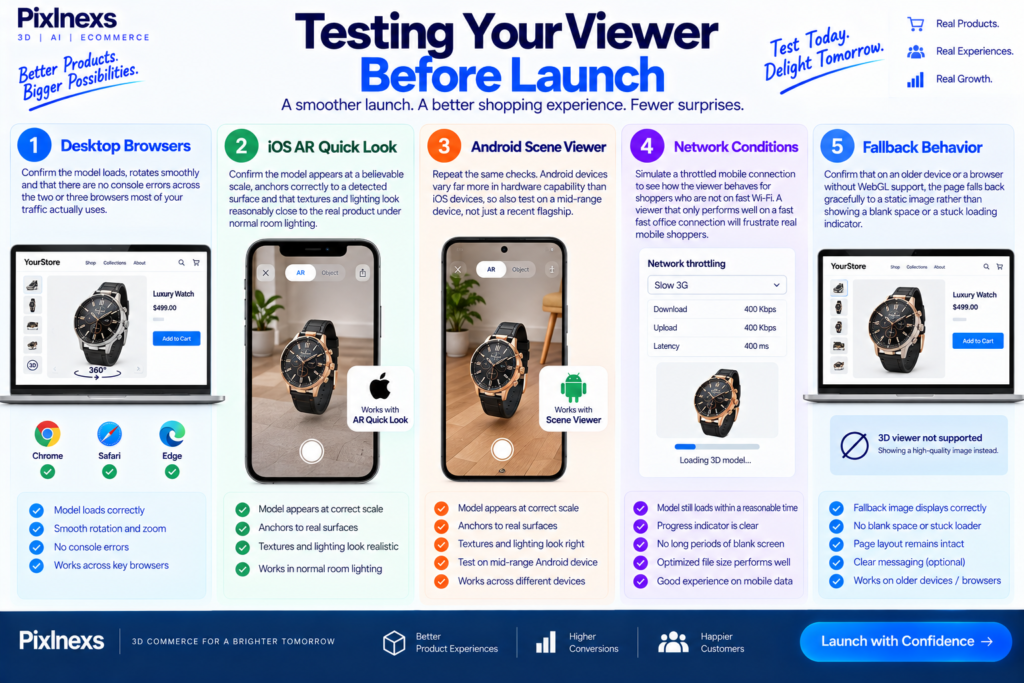
Testing is not a formality it is where most 3D/AR launches actually succeed or fail in the eyes of a shopper. Cover each of these before going live:
Desktop browsers. Confirm the model loads, rotates smoothly and that there are no console errors across the two or three browsers most of your traffic actually uses.
iOS AR Quick Look. Confirm the model appears at a believable scale, anchors correctly to a detected surface and that textures and lighting look reasonably close to the real product under normal room lighting.
Android Scene Viewer. Repeat the same checks. Android devices vary far more in hardware capability than iOS devices, so also test on a mid-range device, not just a recent flagship.
Network conditions. Simulate a throttled mobile connection to see how the viewer behaves for shoppers who are not on fast Wi-Fi. A viewer that only performs well on a fast office connection will frustrate a meaningful share of real mobile shoppers.
Fallback behavior. Confirm that on an older device or a browser without WebGL support, the page falls back gracefully to a static image rather than showing a blank space or a stuck loading indicator.
Common Setup Mistakes and How to Avoid Them
Uploading unoptimized models. A model exported directly from 3D software without decimation or texture compression is often too heavy for mobile. Always run an optimization pass before uploading.
Skipping Android testing. Because AR Quick Look gets most of the attention in tutorials, Scene Viewer testing is easy to skip and Android rendering quirks are correspondingly easy to miss until customers report them.
Assuming theme compatibility without checking. Not confirming native 3D support before starting the upload process leads to wasted time discovering, mid-project, that files simply won’t display without an app or developer involvement.
Leaving out a call-to-action for the feature. Shoppers do not always notice a 3D/AR option automatically. A short line in the product description or a labeled button meaningfully increases how many customers actually use the feature.
No monitoring after launch. Without basic error tracking or engagement analytics on the viewer, a broken model can sit live for weeks before anyone notices, quietly hurting the exact conversion metric the feature was meant to improve.
Maintaining Your Viewer After Launch
A 3D/AR viewer is not a set-and-forget feature. Shopify periodically updates its platform, third-party apps release new versions and AR standards on iOS and Android continue to evolve. Build in a light recurring check quarterly is reasonable for most catalogs where you re-test your live 3D/AR products on current iOS and Android devices to confirm nothing has broken silently after a platform or app update.
It’s also worth revisiting your optimization settings periodically. As device capabilities and typical mobile connection speeds change, the “acceptable” file size ceiling for a smooth mobile experience can shift and a model optimized two years ago may benefit from a fresh optimization pass using newer compression tooling.
Choosing Which Products to Convert First
Not every SKU benefits equally from a 3D/AR viewer and trying to convert an entire catalog before proving the concept on a smaller set is one of the more expensive ways to learn that lesson. A practical prioritization approach looks at three signals together.
Return rate driven by fit or scale. If your existing return data shows customers citing “too big,” “too small,” or “not what I expected” as reasons for returning specific products, those SKUs are strong first candidates AR placement directly targets the scale-misjudgment problem.
Price point and margin. Higher-priced items generally justify the setup cost of a 3D model faster than low-margin items, since even a modest change in conversion or return rate on an expensive item moves more revenue than the same percentage change on a low-cost item.
Visual complexity that photos struggle to convey. Products with texture, dimensionality or moving parts that a flat photo genuinely cannot represent well a textured sofa cushion, a multi-panel cabinet, footwear with visible sole detail tend to benefit more from 3D than a flat, simple item where a good photo already tells the whole story.
Cross-referencing these three signals against your product catalog usually surfaces a manageable pilot list of somewhere between five and twenty SKUs enough to learn real lessons about your specific audience and platform setup without committing your entire media budget to an unproven rollout.
Working With an Existing Photo-Only Catalog
Many merchants approaching this topic do not have 3D models yet at all only the standard photo set most Shopify stores start with. If that’s your starting point, the practical sequence looks slightly different from a merchant who already has 3D assets ready to upload.
First, decide whether your existing product photography is good enough to serve as photogrammetry input or whether you’ll need fresh reference capture. Photogrammetry generally needs many overlapping angle shots under consistent lighting closer to a dedicated capture session than a typical marketing photo shoot, which usually only covers a handful of hero angles.
Second, budget separately for the modeling work itself before worrying about the Shopify integration steps in this guide. The integration checklist above assumes optimized GLB and USDZ files already exist; getting to that starting point is its own project with its own timeline, generally measured in days to weeks per SKU depending on complexity.
Third, treat your pilot batch (from the prioritization exercise above) as the first modeling project, rather than committing budget to model the entire catalog before you’ve validated that the viewer performs well on your actual theme and audience. This keeps the financial exposure of a first 3D/AR project manageable while you learn what does and doesn’t work for your specific store.
How AR Placement Actually Improves the Shopping Experience
It’s worth being specific about what AR placement changes for a shopper, rather than treating it as a generic “wow factor.” The core mechanic anchoring a true-to-scale digital model to a real, camera-detected surface solves two distinct problems that static photography cannot.
The first is spatial reasoning. Humans are notoriously unreliable at judging absolute size from a photo alone, especially without a familiar reference object in frame. AR placement removes the guesswork entirely by rendering the product at real-world scale directly against the customer’s own floor, wall or tabletop, viewed through their own camera.
The second is contextual fit. A product that looks appealing in an isolated studio photo may or may not suit a customer’s actual room, desk or existing decor. AR placement lets the shopper see the product specifically in their space, next to their other furniture or objects, answering a question that no amount of studio photography variation can fully address.
Neither of these benefits requires the model to be flawless in every technical sense what matters most to the shopper is that the scale and proportions are accurate and that the placement feels stable and responsive as they move their phone. Prioritizing those two qualities during optimization and testing, ahead of purely cosmetic polish, generally produces the better real-world outcome.
Frequently Asked Questions
Do I need a developer to add a 3D/AR viewer to Shopify?
Not necessarily. If your theme has native 3D support or you use a well-documented third-party app, a non-developer merchant can often complete the setup by following the app’s instructions and the checklist above. A developer becomes more important if you want custom viewer styling, deep integration with other page elements or your theme has no native or app-based path to 3D support.
What is the maximum file size Shopify supports for 3D models?
Shopify’s platform-level limits can change over time, so the current, authoritative figure should be confirmed directly on Shopify’s own developer documentation. As a practical target regardless of the platform ceiling, keeping your optimized model well under that limit generally in the range of a few megabytes to around 20MB is what actually determines whether the viewer feels fast on a mobile connection.
Can I use the same 3D model for multiple product variants?
Often yes, if the variants share the same geometry and differ only in color or material. In that case, you can typically reuse the base model and swap only the material or texture, which is significantly cheaper than commissioning a separate model per variant.
Will adding a 3D/AR viewer slow down my product page?
It can, if the model is not properly optimized or if it loads immediately rather than lazily. A well-implemented viewer typically loads the 3D asset only when the shopper scrolls to it or explicitly requests it, minimizing the impact on initial page load speed.
Does every shopper see the AR option or only some?
AR placement specifically requires a compatible device a recent iPhone or iPad for AR Quick Look or an ARCore-compatible Android device for Scene Viewer. Shoppers on unsupported or older devices typically still see the 3D model in the standard rotate-and-zoom viewer, just without the AR placement option.
How do I know if my 3D model looks accurate enough to publish?
Compare the rendered model side by side with real product photos under similar lighting, checking color accuracy, proportions and any distinctive surface details like logos or stitching. If something looks noticeably “off” compared to the real product, it is worth a revision round before publishing rather than launching an inaccurate representation that could increase returns rather than reduce them. It’s worth involving someone unfamiliar with the modeling process in this review, since a person who has been staring at the same file for days is often less likely to notice the small discrepancies a first-time customer would spot immediately.
Can I add a 3D/AR viewer to only some products and not others?
Yes. Most implementations, whether native, app-based or custom, work at the individual product level, so you can roll the feature out selectively to your highest-priority SKUs rather than committing to a full-catalog conversion from day one.
What happens if a customer’s phone doesn’t support AR?
The customer simply doesn’t see the AR placement button or sees it disabled with a note that AR isn’t supported on their device. They can still interact with the standard rotate-and-zoom 3D viewer, which works on essentially any modern smartphone or desktop browser with WebGL support, so the core visualization benefit isn’t lost even when full AR placement isn’t available. A well-built implementation checks for AR capability before rendering the button at all, rather than showing a button that fails silently when tapped on an unsupported device.
How often do I need to update or re-check my 3D assets after launch?
There’s no fixed schedule mandated by Shopify but a quarterly check is a reasonable practice for most catalogs, especially after any major theme update, app update or iOS/Android release. AR frameworks and web rendering standards do evolve and an asset that worked flawlessly at launch can occasionally develop rendering quirks after an underlying platform change.
Is it worth adding a 3D/AR viewer if my store gets mostly desktop traffic?
The 3D rotate-and-zoom viewer works well on desktop and adds real value even without AR, since it still lets shoppers inspect the product from angles a static photo gallery can’t provide. AR placement specifically is a mobile-only feature, so its incremental value is naturally lower for a desktop-heavy audience but the underlying 3D model still earns its cost through the improved inspection experience alone. It’s also worth checking whether your desktop-heavy traffic pattern reflects genuine customer preference or simply reflects that mobile shoppers currently have a worse experience on your site, since improving the mobile product page can sometimes shift that balance over time.
What This Looks Like Once It’s Actually Running
Once a 3D/AR viewer is live and stable, the day-to-day experience for your team is largely about monitoring rather than active management. New products entering the pilot category follow the same fifteen-step checklist above, the CDN and viewer configuration you set up initially continues to serve existing SKUs without further intervention and the main ongoing task is the periodic device-compatibility check described earlier.
The more interesting operational question, once the pilot is stable, is how you decide whether to expand beyond it. Rather than a subjective sense that “it’s going well,” tie the decision to the same metrics that justified the pilot in the first place: has the return rate on pilot SKUs moved relative to a comparable set of non-3D products and is there measurable engagement with the AR button itself. If both signals point the same direction, expanding to the next batch of SKUs using the same checklist is a straightforward, low-risk next step.
If the signals are flat or mixed, that’s useful information too it may mean the specific products chosen for the pilot weren’t the ones where scale or fit uncertainty was actually driving hesitation, which points back to revisiting the prioritization exercise rather than assuming the technology itself underperformed.
Want Us to Set Up Your Shopify 3D/AR Viewer?
Getting a 3D/AR viewer live on Shopify involves more moving parts than the upload screen suggests sourcing the right 3D assets, optimizing them correctly, choosing between native support and an app and testing thoroughly across real devices. If you’d rather have a team that does this for a living handle the setup end to end,Ready to add a 3D/AR viewer to your Shopify store?
Ready to add a 3D/AR viewer to your Shopify store?
Pixlnexs sources, optimizes and integrates 3D/AR product assets for Shopify merchants from GLB/USDZ conversion to theme and app setup to cross-device testing.
Start Your Shopify 3D/AR Project With PixlnexsSee our full interactive 3D eCommerce offering, and if you’re still budgeting for the 3D modeling work itself, our breakdown of 3D product model costs is a useful next read before you commit to a rollout plan.
Whether you’re starting from an existing set of 3D assets that just need the right Shopify integration or from a photo-only catalog that needs modeling work first, the same underlying principle applies: pick a small, well-reasoned pilot batch, follow a repeatable checklist, test thoroughly on real devices before launch and let your own store’s data decide whether to expand the program. That approach avoids both extremes never trying 3D/AR at all and over-committing budget to a full-catalog conversion before the format has proven itself on your specific audience.









Leave a Reply