Quick answer: 3D product visualization for fashion means building photoreal, Interactive digital renderings of garments, footwear, handbags and accessories, which consumers are able to manipulate, magnify and inspect in your product pages. For fashion companies, it solves the two main problems people have shopping online – they can’t see how the item fits and drapes and they don’t trust the quality of the material and finish.
With a decent 3D viewer, the user can actually see the actual material, the stitching and the drape of the garment from all angles. To create such a 3D model you need to either scan or model your garment, apply realistic PBR textures to simulate the material, add cloth simulation physics to give the fabric natural drape and then export it in the format that is light enough to load in Shopify, your website or any mobile app. When done properly, it increases the consumer confidence, reduces the number of returns and provides you with an asset you can repurpose for images, videos, AR and advertising.
By the Pixlnexs Animation Studio team, we produce AI video and 3D content and run the marketplace at store.pixlnexs.com, so this reflects real production experience.
Why fashion is harder to visualize in 3D than most categories
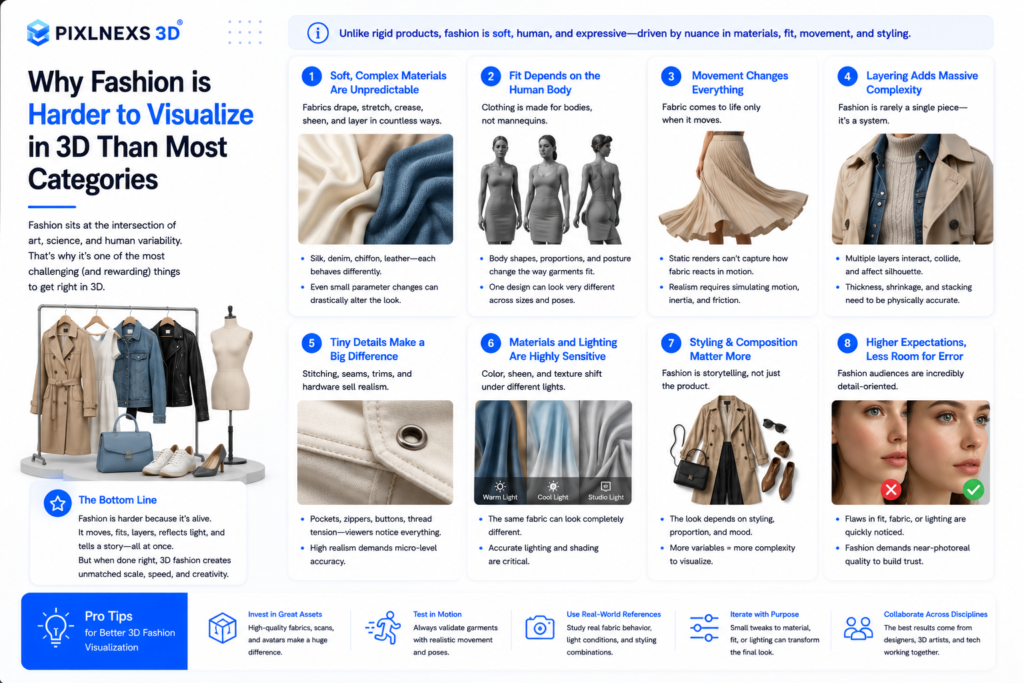
Most product-visualization advice is written for rigid objects: a chair, a speaker, a bottle. Those hold their shape, so a single clean model looks right from any angle. Fashion breaks that assumption.The clothes can be soft, will drape because of the pull of gravity, will wrinkle and the largest component of what makes it attractive is right there on the surface. The shine of the satin fabric, the texture of the suede, the construction of the denim, the delicacy of the chiffon. Construct the dress as a tangible object and it will appear stiff and plasticky.
That is why 3d product visualization for fashion work is its own discipline.This involves the fusion of three elements that rigid goods visualization seldom calls for simultaneously: accurate material capture, realistic cloth simulation and also a model upon which to dress the clothing. If any of these is off, it will be picked up right away, since people have been wearing clothes their entire lives and know what it feels like.
The four things shoppers actually want to judge
- Fit and silhouette. How the garment sits on a body, where it’s loose or tailored.
- Drape and movement. Does it flow, structure, cling, or hold its shape?
- Material and finish. Fabric type, sheen, texture, transparency, hardware.
- Construction detail. Seams, stitching, trims, zippers, buttons up close.
Every production decision below maps back to making these four readable on a screen.
The production pipeline for apparel 3D
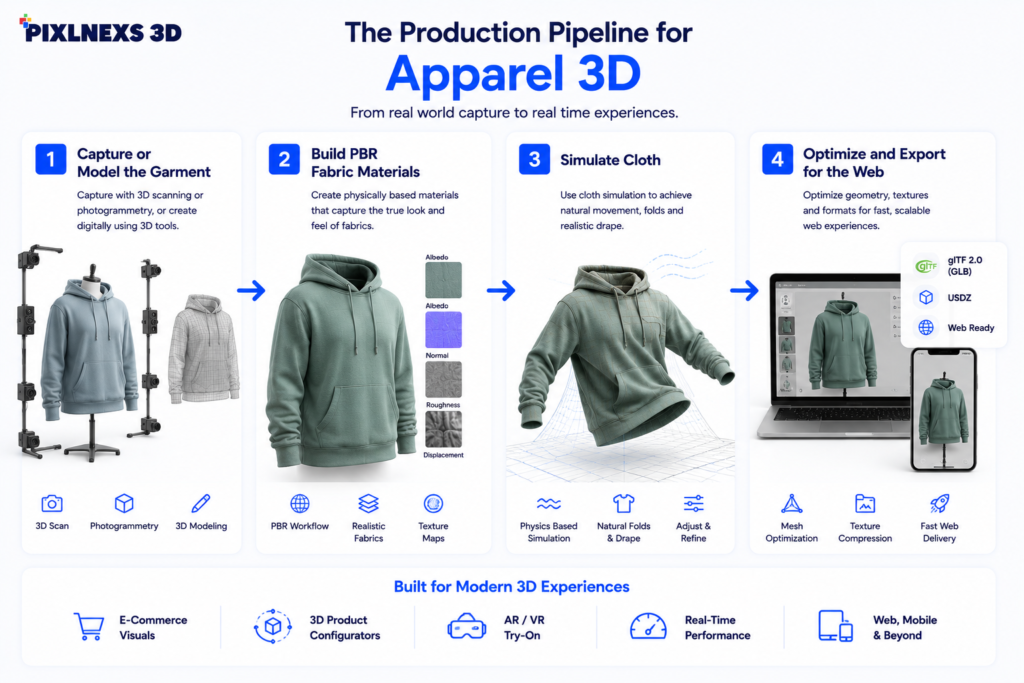
1. Capture or model the garment
There are three authentic approaches. Photogrammetry (multiple pictures of an actual garment merged together to create a mesh) is quick in capturing the actual look of the fabric but fails when it comes to soft and dynamic materials as well as highly reflective surfaces. CAD/pattern-based modeling via such software as CLO 3D and Browzwear creates the garment out of the actual pattern of sewing. This approach is regarded as the industry-standard when talking about the fashion sector since the construction of the digital garment is similar to that of the actual one, hence the result is absolutely accurate.
2. Build PBR fabric materials
Physically based rendering describes a surface by how it really interacts with light: base color, roughness, metalness, normal/bump for weave and sometimes sheen or transmission for velvet and sheer fabrics. This is what separates a believable silk from a shiny garbage bag. PBR is also what makes a material look correct under any lighting, which matters because your web viewer, your AR try-on and your render farm may all light the scene differently. The open glTF format from the Khronos Group bakes a standard PBR material model directly into the file, which is why it has become the default for web 3D.
3. Simulate cloth
This is the part that adds the reality. This involves applying gravity, fabric weight, stiffness and friction to ensure that the fabric takes shape in a realistic manner like it does in reality on a hanger or on the body. It is at this stage that experience counts when setting up the various parameters depending on whether it is a heavy wool coat or a light linen shirt. It is a common mistake by rookies to over simulate and end up getting chaos in form of wrinkles.
4. Optimize and export for the web
A render-quality garment can be millions of polygons with 4K+ textures. The web cannot load that. Optimization (mesh decimation, retopology, texture compression like KTX2/Basis, and draco geometry compression) shrinks the asset to something that loads in a second or two while still looking sharp. The target for an interactive web viewer is typically a GLB in the low single-digit megabytes. Google’s <model-viewer> component, documented on web.dev, is a battle-tested way to drop an optimized GLB onto any page with built-in AR support.
What 3D unlocks beyond the rotating model
The reason 3D pays off is reuse. One well-built garment asset becomes many deliverables:
- Interactive 360° viewers on the product page.
- Photoreal stills for the catalog, ads and lookbooks, with no reshoot per colorway.
- Motion and turntable video for social and PDP autoplay.
- AR “view in your space” or virtual try-on from the same source file.
- Configurators that swap color, fabric or trim live.
For a brand carrying a dress in eight colorways, the 3D approach means modeling once and re-skinning the fabric, instead of styling, shooting and retouching eight times. That is where the economics flip in 3D’s favor.
3D visualization vs. traditional fashion photography
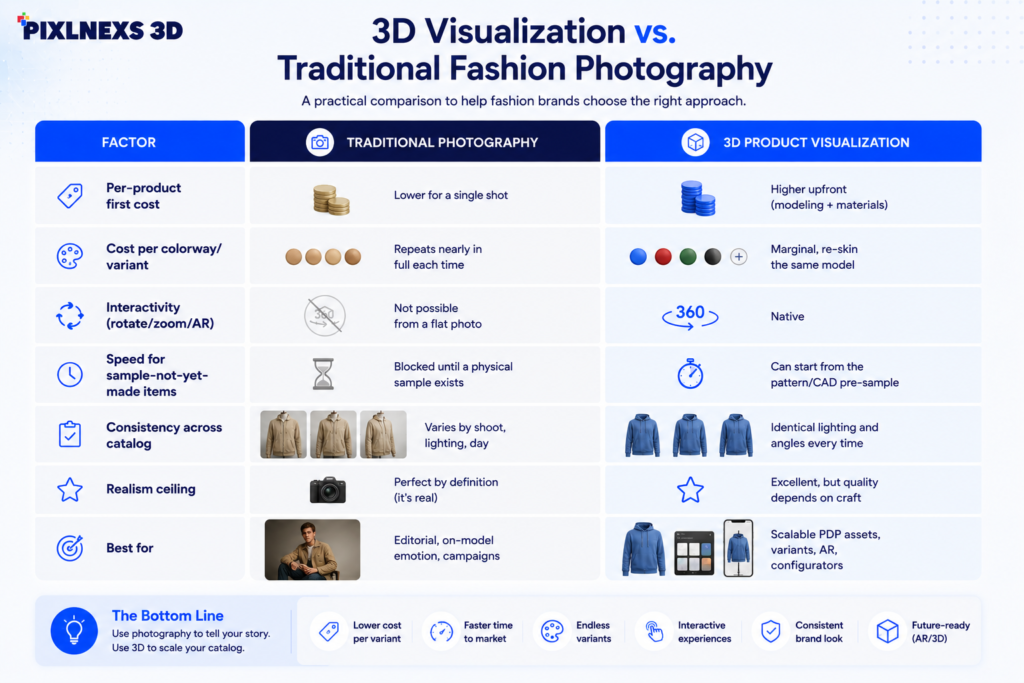
| Factor | Traditional photography | 3D product visualization |
|---|---|---|
| Per-product first cost | Lower for a single shot | Higher upfront (modeling + materials) |
| Cost per colorway/variant | Repeats nearly in full each time | Marginal, re-skin the same model |
| Interactivity (rotate/zoom/AR) | Not possible from a flat photo | Native |
| Speed for sample-not-yet-made items | Blocked until a physical sample exists | Can start from the pattern/CAD pre-sample |
| Consistency across catalog | Varies by shoot, lighting, day | Identical lighting and angles every time |
| Realism ceiling | Perfect by definition (it’s real) | Excellent, but quality depends on craft |
| Best for | Editorial, on-model emotion, campaigns | Scalable PDP assets, variants, AR, configurators |
The honest takeaway: it is rarely all-or-nothing. Many brands use 3D for the scalable PDP and variant work and keep photography for hero campaign and on-model emotional storytelling. They complement each other.
Practical guidance before you commission 3D
Start with your highest-variant SKUs
The ROI of 3D is concentrated in products with many colorways, materials or configurations. A single one-off seasonal piece may be cheaper to photograph. A core staple sold in a dozen finishes is exactly where modeling-once-and-re-skinning wins.
Insist on accurate fabric reference
The single biggest quality driver is feeding your studio real fabric swatches, scans, weights and sometimes the actual pattern. “Make it look like silk” produces generic results. A scanned swatch and a fabric weight (GSM) produces your silk. In practice, the briefs that go sideways are almost always the ones where the brand sent a hex code and a vibe instead of a physical swatch, then asked for revisions when the sheen looked off.
Budget for optimization, not just modeling
A gorgeous render that takes ten seconds to load on mobile will lose the sale. Treat web optimization as a required line item, not an afterthought, and define your performance target (file size, load time) up front. For deeper implementation specifics, our guide on adding an interactive 3D product viewer to Shopify walks through the embed and performance settings step by step.
Decide where interactivity ends and configuration begins
A rotate-and-zoom viewer is a presentation tool. A configurator that swaps color, fabric and trim in real time is a conversion tool, and a bigger build. If your line is highly customizable, read our breakdown of 3D configurators, how they work and what they cost before scoping.
Many of the same realism and optimization principles carry over from hard goods. Our companion guide on 3D product visualization for furniture and home decor covers the rigid-object side of the same craft.
If you want to see finished, production-grade 3D assets and how they’re delivered, browse our 3D model marketplace at store.pixlnexs.com. It’s the easiest way to gauge the quality bar before commissioning custom apparel work.
Conclusion
It is one of the most difficult categories to visualize because people buy not only the clothes but also assess how they fit and feel like wearing them. Good-quality 3D visualization is helpful here as it provides a buyer with more immersive and interactive shopping experience.
The problem is not only about rendering the 3D model but also about creating optimized and high-quality digital asset which shows realistic materials and natural fabric behavior and is also fast enough to be shown on the website. In the case of correct implementation, a single 3D garment becomes capable of generating all the content required to be used on interactive product page, product video, augmented reality experience, digital catalog and marketing campaign without additional photo shoots of multiple variants.
For those who consider their brand’s development on the long term scale, it becomes important not only to get better visual results but also create digital assets which will be reused in future.


Leave a Reply