
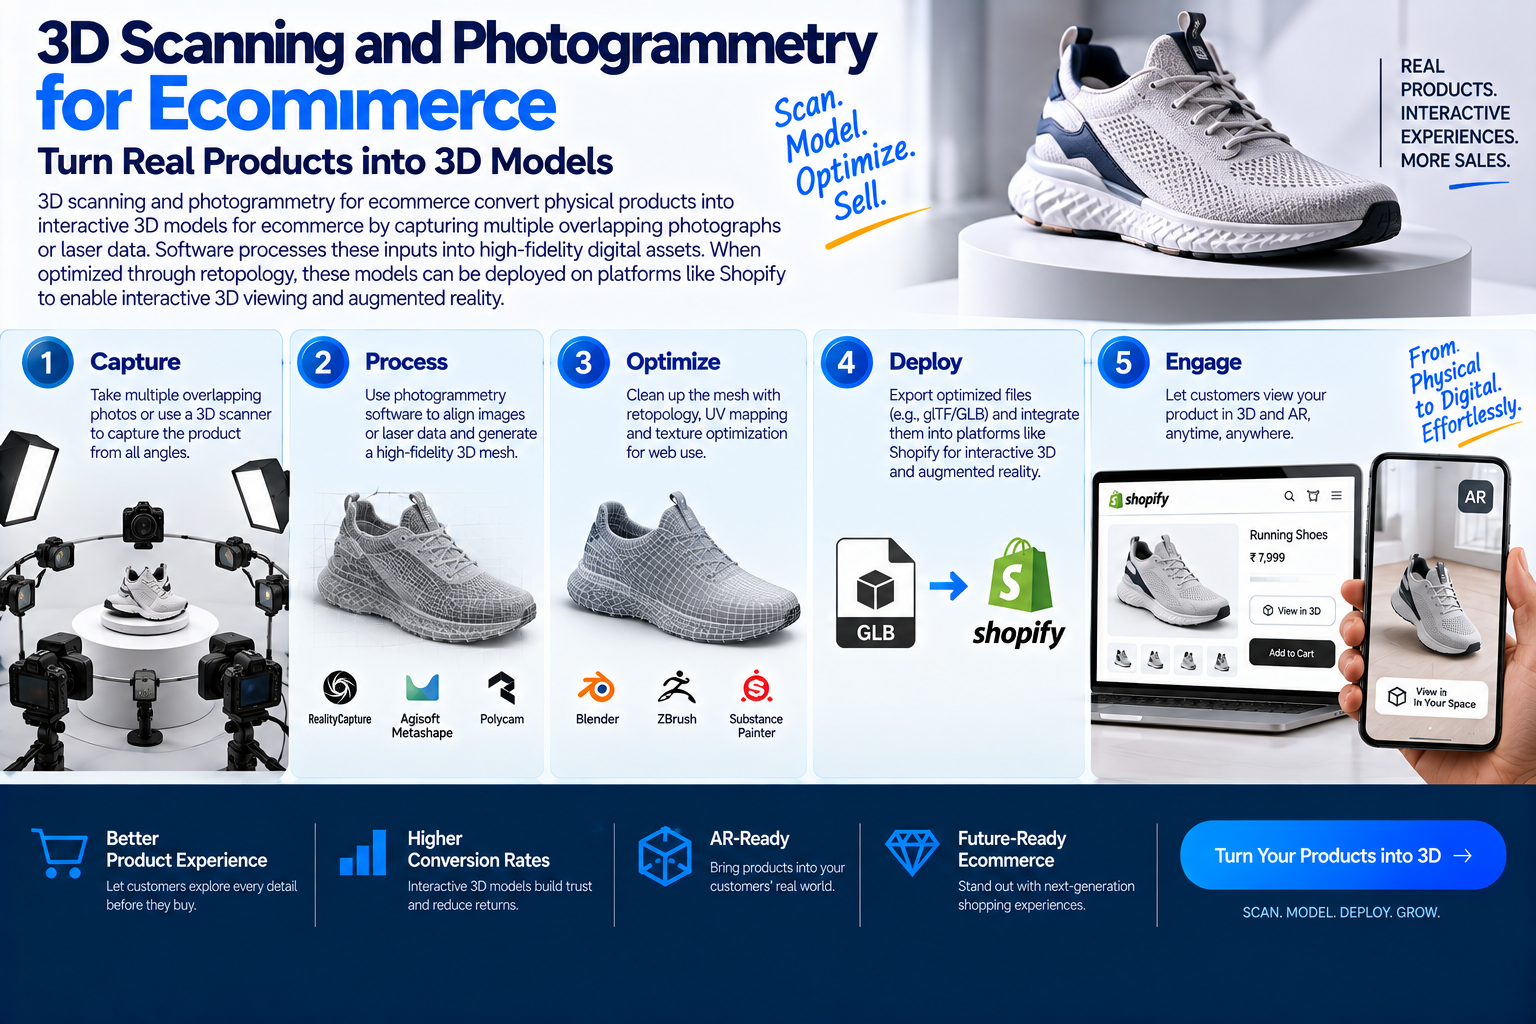
Quick Answer: 3D scanning and photogrammetry for ecommerce convert physical products into interactive 3D models for ecommerce by capturing multiple overlapping photographs or laser data. Software processes these inputs into high-fidelity digital assets. When optimized through retopology, these models can be deployed on platforms like Shopify to enable interactive 3D viewing and augmented reality.
Key Takeaways
- Photogrammetry is highly accessible: You can generate high-fidelity 3D models using a standard DSLR or smartphone camera combined with reconstruction software.
- Raw scans require optimization: Automated scans produce dense, unoptimized meshes that must undergo retopology and UV unwrapping before they are ready for web deployment.
- Material properties dictate the method: Matte, textured and organic items scan beautifully, whereas highly reflective, transparent or featureless objects require specialized preparation.
- Interactive assets boost engagement: Replacing static flat images with real-time 3D viewers and augmented reality assets helps reduce product returns and increases customer purchasing confidence.
By Manoj, Pixlnexs Studio. Pixlnexs builds interactive 3D and AR product visualization for ecommerce brands and this guide reflects the exact photogrammetry-to-web pipeline our production team runs on every catalog we digitize.
Why Is Static Product Photography Failing Your Online Store?

Running an online storefront means constantly fighting for customer trust. When buyers browse your catalog, they try to answer basic questions: How large is this item? What does the texture actually feel like? How does the color shift under different lighting?
Traditional flat photography fails to answer these questions completely. You might spend significant resources booking a physical photo studio, shipping product samples, waiting for edits and uploading multiple high-resolution images per product. Yet, customers still return items because the physical product did not match their mental expectations. A missed angle or a slightly misrepresented texture can lead to a costly return cycle.
This is where physical-to-digital translation comes in. By converting your physical inventory into accurate 3D assets, you allow customers to rotate, zoom and inspect products from every conceivable angle. They can place a virtual version of a shoe, a handbag or a piece of furniture directly into their physical space using augmented reality.
The barrier for many brands has always been the perceived complexity of creating these assets. Manual 3D modeling from scratch can be time-consuming and expensive, especially for organic shapes with complex textures. 3D scanning and photogrammetry offer a direct way to capture real-world objects and turn them into highly accurate digital twins. This guide will explain how to implement this technology in your ecommerce pipeline.
How Does 3D Scanning and Photogrammetry for Ecommerce?
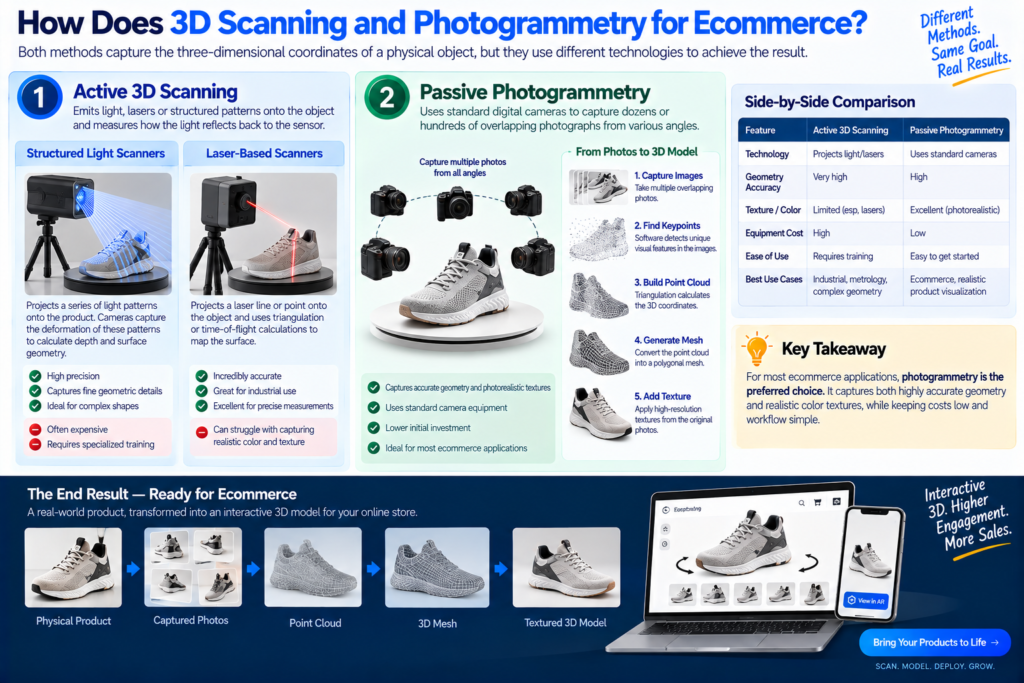
To understand how to digitize your inventory, you must first understand the distinction between active 3D scanning and passive photogrammetry. Both methods aim to capture the three-dimensional coordinates of a physical object but they use different technologies to achieve this result.
Active 3D Scanning
Active scanning relies on emitting light, lasers or structured patterns onto the object and measuring how the light reflects back to the sensor.
- Structured Light Scanners: These devices project a series of light patterns onto the product. Cameras capture the deformation of these patterns on the surface to calculate the depth and surface geometry. This method is highly precise and excellent for capturing fine geometric details but the hardware is often expensive and requires specialized training.
- Laser-Based Scanners: These systems project a laser line or point onto the object and use triangulation or time-of-flight calculations to map the surface. While incredibly accurate for industrial metrology, they can struggle with capturing color and texture data with the fidelity required for realistic ecommerce displays.
Passive Photogrammetry
Photogrammetry is a passive capture method. It does not project light onto the object. Instead, it uses standard digital cameras to capture dozens or hundreds of overlapping photographs from various angles.
The underlying software analyzes these images, identifying unique visual features (keypoints) present in multiple photos. By calculating the relative position of the camera for each shot, the software uses triangulation algorithms to determine the exact 3D coordinates of those keypoints. This process builds a dense point cloud, which is then converted into a polygonal mesh and wrapped in a high-resolution texture map derived directly from the original photos.
For most ecommerce applications, photogrammetry is the preferred choice. It captures both highly accurate geometry and photorealistic color textures simultaneously. Because it uses standard camera equipment, the initial investment is much lower than purchasing industrial active scanners.
Why Should Ecommerce Brands Choose Scanning Over Traditional Photography?

Moving from flat images to 3D assets is not just about adopting new technology; it is about changing how customers interact with your brand.
Reducing Return Rates Through Spatial Clarity
The primary driver of product returns in ecommerce is a mismatch between expectation and reality. A customer cannot fully grasp the scale of a backpack or the drape of a leather jacket from three flat photos. By providing an interactive 3D model, you give the customer control over the inspection process. They can zoom in on stitching, examine the underside of a sole and understand the depth of a product. This spatial clarity leads to more informed purchasing decisions and fewer returns.
Enabling Immersive Augmented Reality
Augmented Reality (AR) allows customers to preview products in their own environments before buying. A shopper can see if a coffee table fits between their sofa and television or if a pair of sunglasses suits their face shape.
[Physical Product] ➔ [Photogrammetry Capture] ➔ [3D Reconstruction] ➔ [Optimization] ➔ [AR/Web Deployment]
These interactive experiences are built entirely on 3D models. If you rely solely on traditional photography, you exclude your brand from these highly engaging sales channels.
Long-Term Asset Reusability
When you shoot a physical photograph, that image is static. If you need a new angle, a different lighting setup or a seasonal background, you must schedule a new photo shoot.
When you capture a product as a high-quality 3D model, you own a digital twin that can be reused indefinitely. You can:
Render high-resolution marketing images from any angle.
Create video animations showing the product in motion.
Place the product in diverse virtual environments (lifestyle renders) without renting physical locations.
Update the product’s color or material digitally if you launch new variations.
This flexibility makes 3D assets highly cost-effective over time. If you are debating whether to scan or model your products, you can read our detailed guide on choosing between 3D scanning and manual 3D modeling to determine which approach fits your catalog.
How Do You Capture High-Quality Product Images for Photogrammetry?
The quality of your final 3D model is directly determined by the quality of your input photographs. If your photos are blurry, poorly lit or lack sufficient overlap, the reconstruction software will fail to generate a clean mesh. Setting up a proper capture environment is critical.
The Lighting Setup: Eliminating Shadows and Highlights
For photogrammetry, you want to capture diffuse, even lighting. You must avoid harsh shadows and strong specular highlights (shiny reflections). If your photos contain baked-in shadows, those shadows will be projected onto your 3D model’s texture, making the model look unnatural when placed in different virtual lighting environments.
- Softboxes and Diffusers: Use at least two, preferably three, large softboxes to flood the product with soft, even light from multiple directions.
- Light Tents: For smaller items, a white light tent is highly effective at diffusing light and eliminating distracting reflections.
- Polarizing Filters: Using a circular polarizer on your camera lens, combined with polarizing sheets over your lights (a technique known as cross-polarization), can eliminate glare and reflections from semi-glossy surfaces.
Camera Settings for Maximum Sharpness
To help the software align your images, every part of the product must be in sharp focus. Blurry areas will confuse the reconstruction algorithms.
- Manual Mode: Always shoot in full manual mode to ensure exposure, white balance and focus remain completely consistent across all photos.
- Aperture (f-stop): Use a high f-stop, typically between f/8 and f/11. This creates a deep depth of field, keeping the entire product in focus. Avoid going higher than f/16, as lens diffraction can introduce softness.
- ISO: Keep your ISO as low as possible (typically ISO 100) to prevent digital noise. Noise introduces random pixels that the software may mistake for physical surface details.
- Shutter Speed and Tripods: Since you are using a high f-stop and low ISO, your shutter speed may be slow. Always mount your camera on a sturdy tripod and use a remote shutter release or a self-timer to prevent camera shake.
The Turntable vs. Fixed Camera Method
There are two primary ways to capture the necessary angles:
- The Turntable Method: Place the product on a rotating turntable against a smooth, featureless background (such as a matte white or black sweep). The camera remains stationary on a tripod. As you rotate the turntable by small increments, you take a photo. Because the background must remain static while the object moves, you must use a masking process in your software so the background is ignored.
- The Fixed Product Method: The product remains completely stationary on a pedestal and you move the camera around it in concentric circles at different heights. This method is highly reliable because the relationship between the product and its shadows never changes but it requires more physical space and careful camera handling.
Ensuring Proper Image Overlap
The photogrammetry software needs to see every point on the product in multiple images to calculate its position in 3D space.
- Aim for significant overlap between consecutive photos.
- Capture the product from at least three different heights: a low angle looking up, an eye-level angle and a high angle looking down.
- For a standard product, this usually results in 36 to 72 photos per loop, with 3 loops at different heights, totaling 108 to 216 photos.
If you want to start testing this process immediately without investing in expensive studio gear, you can read our step-by-step guide to scanning products with a smartphone camera.
Which Photogrammetry Software Is Best for Processing Your Scans?
Once you have captured your images, you must process them using photogrammetry software to reconstruct the 3D geometry. Several professional options exist, each with its own strengths and processing pipelines.
RealityCapture (Epic Games)
RealityCapture is widely known for its speed and ability to handle massive datasets containing thousands of high-resolution images.
- Strengths: Incredibly fast processing times, excellent alignment algorithms and the ability to work with mixed inputs (such as combining laser scans with photos).
- Licensing: It uses a subscription or pay-per-input model, making it highly accessible for businesses of all sizes.
- Best For: Teams processing large volumes of products or highly detailed assets where processing speed is a priority.
Agisoft Metashape
Agisoft Metashape is a mature, highly reliable photogrammetry tool used extensively in cultural heritage preservation, surveying and product visualization.
- Strengths: Exceptional texture generation quality, robust alignment of difficult surfaces and a highly customizable workflow with Python scripting support.
- Licensing: Offers a one-time perpetual license model, which is appealing for long-term production pipelines.
- Best For: Projects requiring maximum texture fidelity and precise control over the alignment and mesh generation steps.
3DF Zephyr
3DF Zephyr is a user-friendly photogrammetry suite that offers a gentle learning curve while maintaining professional-grade output.
- Strengths: Intuitive wizards that guide you through the reconstruction process, excellent built-in mesh editing tools and strong support for exporting to various formats.
- Licensing: Offers both free tiers (limited to a small number of photos) and professional perpetual licenses.
- Best For: Beginners and mid-sized teams who want an all-in-one tool without needing complex external editing software for basic cleanup.
For a deeper analysis of these tools, including performance benchmarks and feature comparisons, see our comparative review of the top photogrammetry software platforms.
Ready to turn your product catalog into interactive 3D?
Pixlnexs runs the full photogrammetry pipeline end to end capture, retopology, UV unwrapping and PBR texturing for ecommerce brands moving beyond static photography.
Talk to PixlnexsWhat Happens After Processing to Make Scanned Models Web-Ready?
A common misconception is that photogrammetry software outputs a finished, web-ready 3D model. In reality, the raw output from these programs is completely unusable for ecommerce platforms.
The raw scan is typically a “high-poly” mesh consisting of millions of disorganized triangles, weighing hundreds of megabytes. The textures are often fragmented into dozens of tiny, unoptimized image files. If you try to upload this raw file to an online store, it will crash the user’s browser or take minutes to load on a mobile device.
To make the model web-ready, it must go through an optimization pipeline.
1. Retopology: Rebuilding the Mesh
Retopology is the process of creating a clean, low-polygon mesh over the top of the dense, chaotic raw scan. This clean mesh uses organized, four-sided polygons (quads) or clean triangles.
- Manual Retopology: Using software like Blender, Maya or RetopoFlow, a 3D artist manually draws clean topology lines over the scan. This ensures that edges are perfectly straight, curves are smooth and the polygon count is kept to a minimum (usually under 50,000 polygons for web use).
- Automatic Retopology: Tools like ZBrush (ZRemesher) or Instant Meshes can automate this process, though they often require manual cleanup afterward to ensure perfect edge flow on hard-surface products.
2. UV Unwrapping: Preparing for Textures
Before you can apply a 2D image texture to a 3D model, the 3D model must be flattened into 2D space. This is called UV unwrapping. Think of it like carefully cutting and flattening a cardboard box so it lies flat on a table.
- A clean UV layout minimizes stretching and seams.
- It maximizes the use of the 2D texture space, ensuring that important details (like logos or fine textures) receive more pixel density.
3. Baking: Transferring Detail to the Low-Poly Mesh
How do you make a low-polygon model look incredibly detailed? You use a process called baking.
You take the high-poly raw scan and project its fine geometric details onto the clean, low-poly mesh. This detail is saved as a series of specialized texture maps:
- Normal Map: A map that tells the rendering engine how light should bounce off the surface, simulating fine details like wrinkles, pores, stitching and scratches without adding actual polygons.
- Ambient Occlusion (AO) Map: A map that bakes in soft, realistic shadows in crevices and tight spaces, adding depth to the model.
4. PBR Texturing (Physically Based Rendering)
To make the model look realistic under any lighting conditions, you must create Physically Based Rendering (PBR) textures. These include:
- Albedo Map: A base color map that represents the object’s color without lighting or shading.
- Roughness Map: Controls how light reflects off the surface—smooth surfaces reflect light sharply, while rough surfaces scatter it.
- Metalness Map: Defines which parts of the surface are metallic and which are not.
These textures ensure the model reacts naturally to different lighting environments, whether it’s displayed on a website or in augmented reality.
How Do You Choose Between Photogrammetry and Manual 3D Modeling?
Choosing between photogrammetry and manual 3D modeling depends on your product catalog, budget and timeline. Here’s an honest comparison:
Photogrammetry
Pros:
Hyper-realistic Textures: Captures organic textures, wear-and-tear, stitching and complex shapes with unmatched fidelity.
Speed for Complex Shapes: Extremely fast for digitizing intricate organic objects like furniture, shoes or food items.
Cons:
Surface Limitations: Struggles with highly reflective, transparent or featureless surfaces (e.g., chrome, glass or smooth white plastics).
Physical Access Required: You need the physical product to scan it.
Manual 3D Modeling (CAD-to-3D or Polygonal Modeling)
Pros:
Precision for Hard Surfaces: Perfect for electronics, machinery and products with clean geometric lines.
Customization: Easily modify colors, add configurations or create variations without rescanning.
No Physical Prototype Needed:* Can work directly from CAD files if they exist.
Cons:
Time-Consuming for Organics: Extremely expensive and slow to manually sculpt organic textures (e.g., worn leather, woven fabrics) to look realistic.
Less Realistic Textures: Manual texturing rarely matches the fidelity of real-world scans.
For most ecommerce brands, a hybrid approach works best: use photogrammetry for organic products and manual modeling for hard-surface items. Read our guide on 3D scanning vs. manual modeling for a deeper dive.
| Factor | Photogrammetry | Manual 3D Modeling |
|---|---|---|
| Best For | Organic shapes, textured surfaces (furniture, shoes, food) | Hard-surface products (electronics, machinery) |
| Realism | Hyper-realistic, captures real wear and texture | Depends on artist skill, rarely matches real-world fidelity |
| Speed | Fast for complex organic objects | Slower, especially for organic detail |
| Physical Product Required | Yes | No, can work from CAD files |
| Struggles With | Reflective, transparent, featureless surfaces | Nothing structurally, but time-intensive for organics |
Frequently Asked Questions
1. Can I use photogrammetry for transparent or reflective products?
Photogrammetry struggles with highly reflective or transparent surfaces because they create glare, reflections or lack sufficient texture detail. For such products, manual 3D modeling or specialized scanning techniques (e.g., using polarizing filters) are better options.
2. How much does it cost to set up a photogrammetry studio?
Basic setups can start at a modest cost using a DSLR camera, turntable and soft box lights. Professional studios with automated turntables, high-end cameras and advanced lighting require a more substantial investment.
3. Can I use photogrammetry software for free?
Some software like 3DF Zephyr offers free tiers but they limit the number of photos or output quality. For professional use, paid licenses are necessary, with costs varying widely depending on the tool.
4. How long does it take to go from capturing photos to a finished, web-ready 3D model?
Timeline depends heavily on product complexity and how much manual retopology cleanup is needed. A simple, single-material product might move from capture to a finished asset in a few days; a complex item with multiple materials and intricate geometry can take considerably longer, mainly due to the retopology and texturing stages rather than the initial photo capture.
5. Do I need a dedicated studio space or can I scan products at home?
A dedicated space helps mainly because it makes consistent, controlled lighting easier to maintain across every shot in a session. A simple home setup with a light tent, a couple of softboxes and a plain background can produce usable results for smaller products; larger items or a growing catalog usually justify a more permanent studio setup over time.
6. What’s the difference between a 3D scan meant for web viewing and one meant for 3D printing?
A web-ready model is optimized for small file size and fast rendering, typically under 50,000 polygons with baked normal maps standing in for fine detail. A 3D-printing-ready scan instead needs to preserve actual geometric detail and be watertight (no holes in the mesh) since a printer physically builds the surface rather than simulating it with a texture. The two use cases call for different optimization priorities from the same raw scan.
By adopting 3D scanning and photogrammetry, ecommerce brands can transform their product catalogs into immersive, interactive experiences that drive sales and reduce returns. Whether you’re scanning a single product or an entire inventory, the technology is more accessible than ever.








Leave a Reply