

Quick answer: AR try-on for eCommerce usually falls into three cost tiers. There’s the no-code app or plug-in (roughly a monthly SaaS subscription plus per-model 3D asset creation), a built-from-scratch WebAR experience (a one-time development project plus ongoing maintenance) or a done-for-you content and integration partner that handles the 3D modeling and embedding for you. The single biggest cost driver isn’t the AR software at all. It’s producing accurate 3D models of your products.
For most Shopify, WooCommerce or Magento merchants, the most predictable path is a SaaS AR viewer for the front-end plus a 3D content partner for the assets. We’d pair a standards-based WebAR viewer with professionally produced 3D models so the experience works on iOS and Android with no app download. Pixlnexs Animation Studio produces those 3D models and can hand you embed-ready files for your existing store.
By the Pixlnexs Animation Studio team, we produce AI video and 3D content and run store.pixlnexs.com, so this reflects real production experience.
What “AR try-on” actually means for an online store
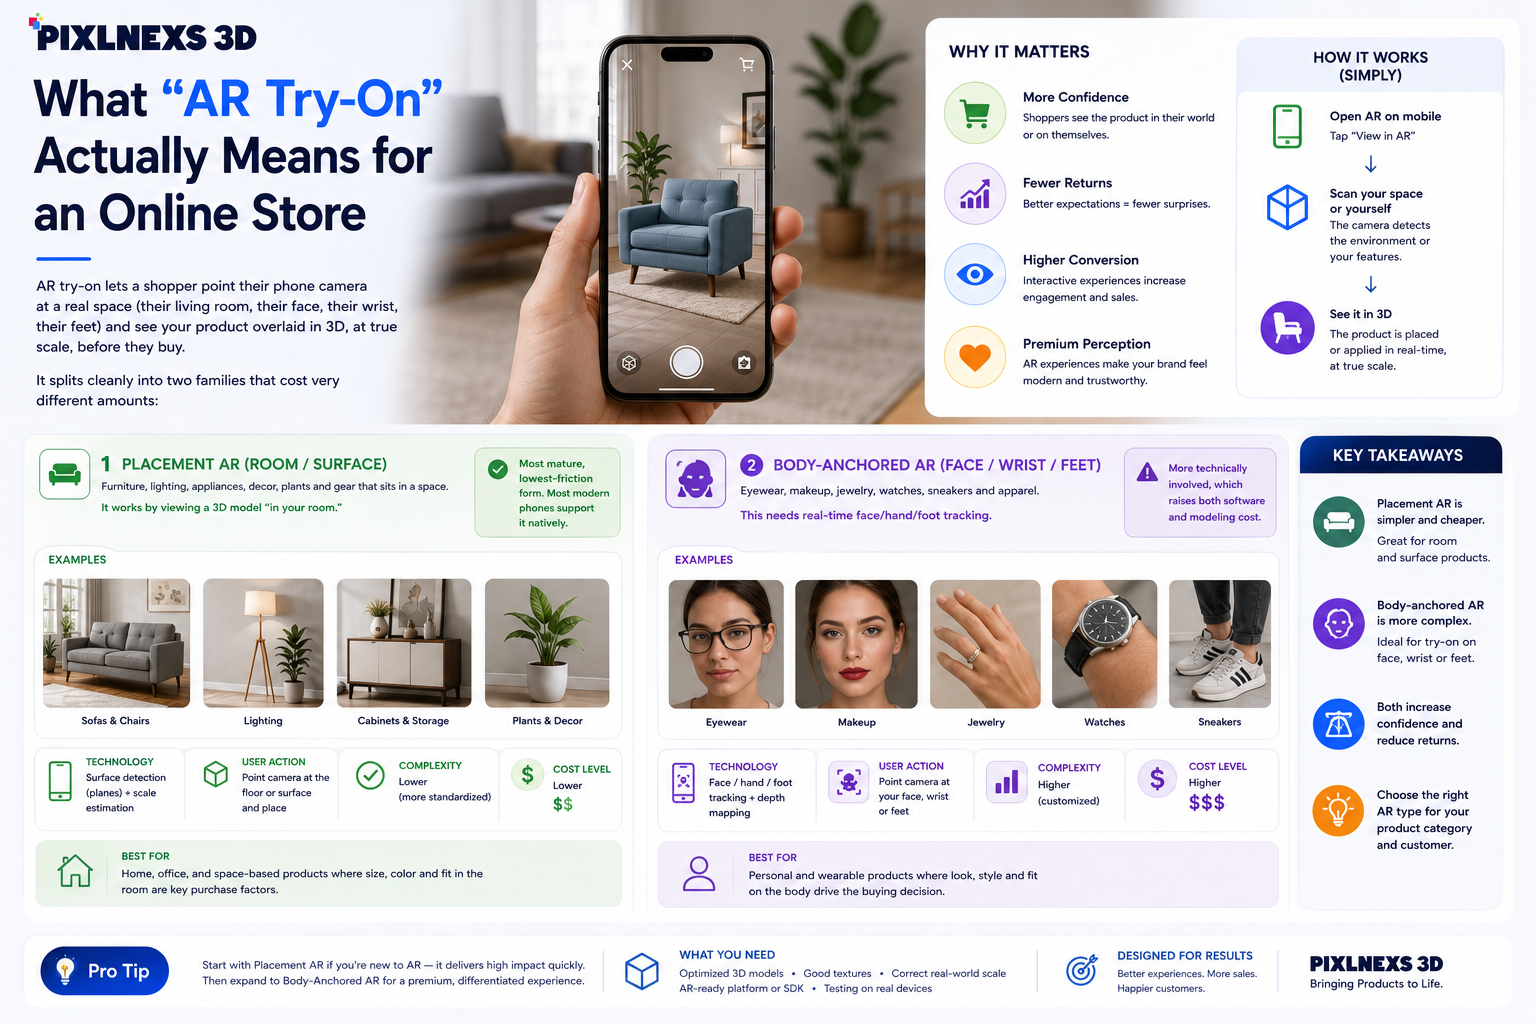
AR try-on lets a shopper point their phone camera at a real space (their living room, their face, their wrist, their feet) and see your product overlaid in 3D, at true scale, before they buy. It splits cleanly into two families that cost very different amounts:
- Placement AR (room/surface): furniture, lighting, appliances, decor, plants and gear that sits in a space. It works by viewing a 3D model “in your room.” This is the most mature, lowest-friction form and most modern phones support it natively.
- Body-anchored AR (face/wrist/feet): eyewear, makeup, jewelry, watches, sneakers and apparel. This needs real-time face/hand/foot tracking and is more technically involved, which raises both software and modeling cost.
Figuring out which family you need is the first cost decision, because it determines whether you can use a simple model viewer or need a specialized tracking SDK.
The three ways to add AR try-on and what drives the cost
Whatever route you take, your total cost is the sum of three line items: the AR software (the viewer or SDK), the 3D assets (one model per product or variant) and integration plus maintenance (getting it into your product pages and keeping it working). Here’s how the three approaches compare on the dimensions that actually matter.
| Dimension | No-code app / plug-in | Custom-built WebAR | Done-for-you content + integration |
|---|---|---|---|
| Best for | Shopify/WooCommerce stores wanting a fast start | Brands needing a unique, owned experience | Stores that lack 3D models and dev time |
| Main cost line | Recurring subscription | One-time build + ongoing maintenance | Per-model 3D production + setup |
| 3D assets included? | Usually not, you supply or pay extra | No, quoted separately | Yes, that is the core deliverable |
| Time to launch | Fastest (days, if you have models) | Slowest (weeks to months) | Moderate (gated by modeling) |
| Technical effort on you | Low | High | Low to moderate |
| Ownership of assets | Often tied to the app | Full | Full (you keep the .glb files) |
| Body-anchored try-on | Depends on the app’s category support | Fully customizable | Depends on partner capability |
We’ve deliberately left dollar figures out of that table. AR pricing swings wildly by platform, region, catalog size and product complexity and any fixed number we quoted would be wrong for most readers. The honest takeaway is structural: the recurring software fee is rarely the expensive part. The 3D models are. A single high-quality, optimized 3D product model is real artisan work and you need one per product (sometimes one per color or material variant).
Why 3D models dominate your AR budget
A web-ready AR model is not just “a 3D render.” It has to be geometrically accurate to your real product, textured with physically based materials so it looks right under any lighting, scaled to true real-world dimensions (so a sofa is actually sofa-sized in the room) and aggressively optimized so it loads on a mid-range phone over mobile data. That optimization step, keeping the file small while keeping it convincing, is where amateur models fall apart and conversions die.
Here’s what actually happens when you skip it: the model loads fine on your office WiFi, then a shopper on a three-year-old Android over patchy 4G stares at a spinner for eight seconds and bounces. You never see it in your testing.
You can source models three ways and each trades cost against control:
- Photogrammetry / scanning: fast for organic shapes but messy topology and large files often need cleanup before they’re web-ready.
- Manual 3D modeling: the highest fidelity and cleanest files, ideal for hero products and anything with branding or fine detail.
- AI-assisted generation: increasingly useful for speed, especially as a starting point a human artist refines.
At Pixlnexs Animation Studio we combine AI-assisted generation with human 3D craft and we maintain a marketplace of ready-to-use 3D assets at store.pixlnexs.com. If a model close to your product already exists, buying and adapting it is far cheaper than commissioning one from scratch.
How the technology actually works (so you can scope it honestly)
Most placement AR on the web today runs through a standards-based 3D viewer that hands off to the phone’s built-in AR mode, Scene Viewer on Android and AR Quick Look on iOS, using the open glTF / GLB file format. That means no app download for the shopper and broad device coverage out of the box. Google’s open-source ARCore and the model-viewer web component are the most common foundation and they’re free to use. Your cost is the models and the integration, not a license.
Body-anchored try-on (face, wrist, feet) is a different animal. It relies on real-time computer-vision tracking, the kind of capability standardized in browsers via the emerging WebXR Device API and delivered today through specialized tracking SDKs. Because tracking is harder than placement, both the software and the model preparation are more involved, which is why eyewear and jewelry try-on usually costs more than furniture placement.
A realistic step by step to add AR try-on
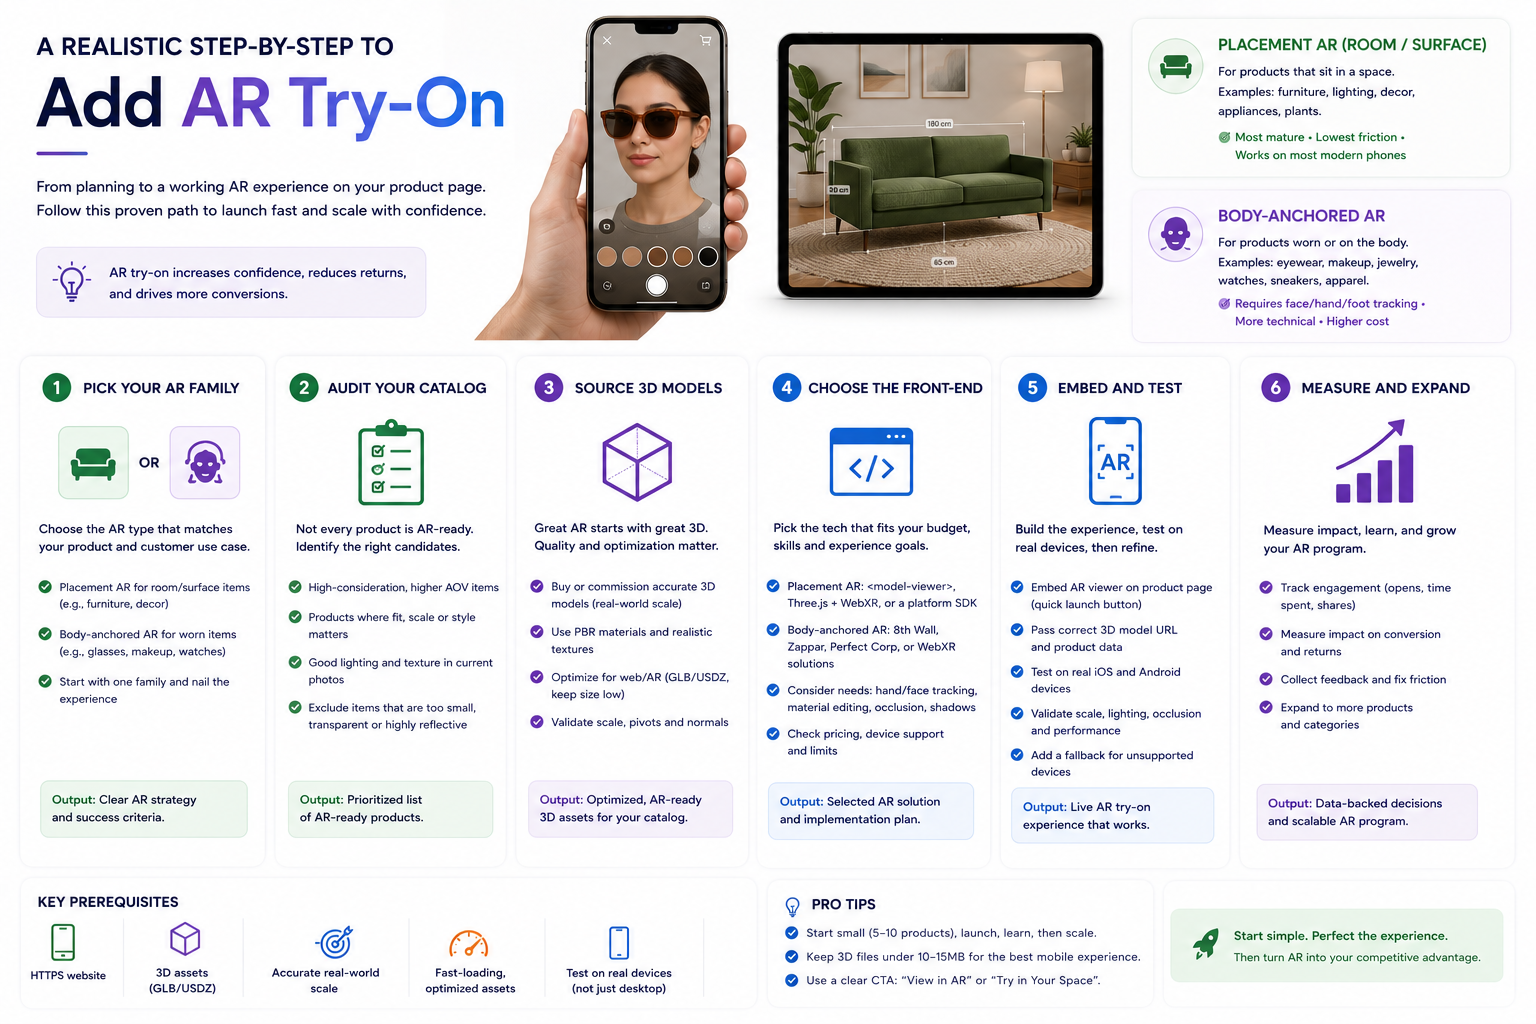
1. Pick your AR family
Decide placement vs. body-anchored based on what you sell. Don’t pay for face-tracking you’ll never use.
2. Audit your catalog
Count how many products and variants genuinely need AR. Start with your top sellers and highest-return-rate items. Those are where AR pays back fastest.
3. Source 3D models
This is the long pole. Check a marketplace like store.pixlnexs.com first, then commission the rest. Insist on real-world scale, PBR materials and web-optimized file sizes.
4. Choose the front-end
For most stores, a model-viewer-based AR button on the product page is enough. Reach for a tracking SDK only if you need body-anchored try-on.
5. Embed and test
Add the viewer to your product template, then test on real iOS and Android devices over mobile data, not just desktop. See our walkthrough on how to add a 3D product viewer to WooCommerce for a concrete example.
6. Measure and expand
Track AR engagement, add-to-cart lift and return rate on AR-enabled products before rolling AR across the whole catalog.
Who should choose what
- Small store, a few hero products, no 3D models yet: Buy or commission a handful of optimized models and embed a free model-viewer AR button. Lowest total cost. A content partner like Pixlnexs handles the models; your dev or theme handles the button.
- Mid-size catalog, want it live quickly, no internal 3D team: Go done-for-you. Let a partner produce the models and hand you embed-ready files, then drop them into your existing store. This is the path most of our clients take.
- Large brand wanting a signature, fully owned experience: Invest in a custom WebAR build but still outsource the modeling unless you have an in-house 3D studio. The build is the smaller risk; the asset pipeline is the bigger one.
- Eyewear, jewelry, watches, sneakers: You need body-anchored tracking. Budget more for both software and model prep and validate the tracking quality on real devices before committing. One thing that catches people out: tracking that looks crisp in a vendor demo can wobble badly under your store’s real lighting and on older front cameras, so test with your own products on your own staff’s phones before you sign anything.
Still deciding whether to license software or hire a studio? Our guide on build vs. buy: 3D configurator software vs a done-for-you studio walks through the same trade-off in depth and if you sell vehicles or large configurable goods, see 3D product visualization for automotive.
How Pixlnexs Animation Studio fits
We’re a 3D content studio, not an AR-app reseller, which means we go after the part of the budget that actually hurts: the models. We produce accurate, web-optimized, true-to-scale 3D models of your products, hand you the GLB/USDZ files you own outright and help you embed them into Shopify, WooCommerce or a custom storefront. Where a model close to yours already exists, you can license it instantly from store.pixlnexs.com instead of paying for net-new production. To scope your catalog and get a clear quote, talk to us at pixlnexs.com.
Frequently asked questions
Related guides
- Build vs. Buy: 3D Configurator Software vs a Done-For-You Studio
- How to Add a 3D Product Viewer to WooCommerce
- 3D Product Visualization for Automotive: Configurators & Showrooms
- Pixlnexs Animation Studio, 3D content & AR services









Leave a Reply