
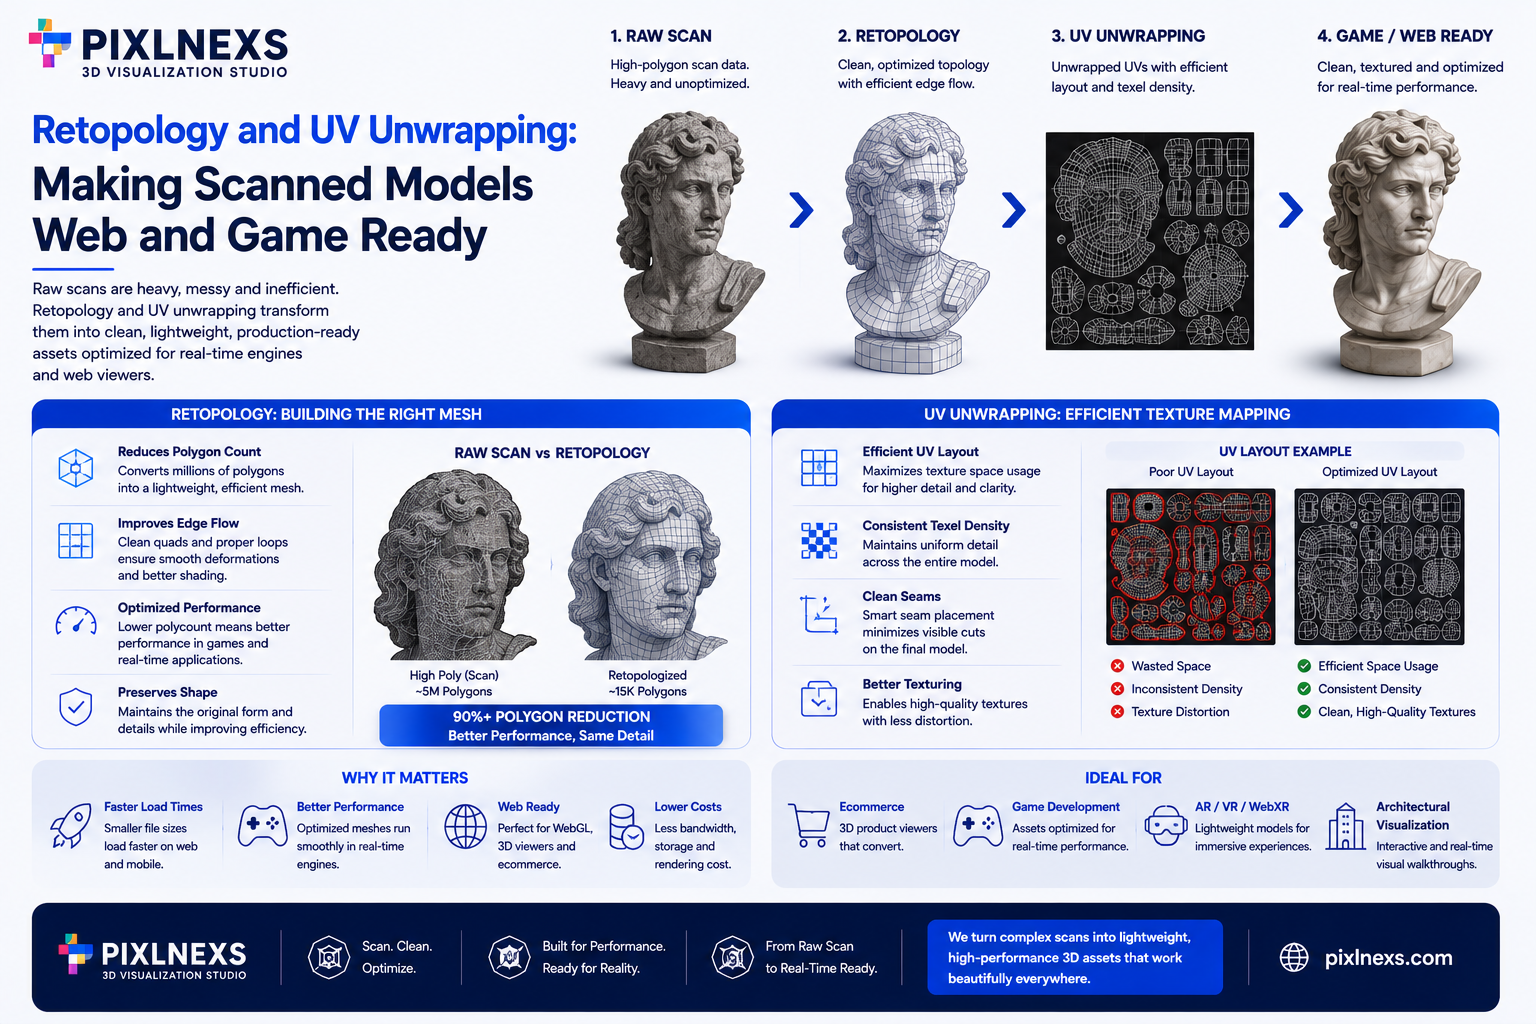
Quick Answer: Retopology and UV unwrapping are essential post-processing steps that transform raw, high-polygon 3D scans into optimized assets suitable for web and game engines. Retopology rebuilds the mesh with clean, efficient geometry, while UV unwrapping maps textures correctly onto the surface. Without these steps, scanned models remain too heavy for browsers and display visual artifacts, making them unusable for ecommerce or interactive experiences.
At Pixlnexs, our 3D visualization team retopologizes and UV-unwraps every scanned product asset before it goes live on a client’s store we’ve processed this pipeline across hundreds of SKUs for ecommerce catalogs.
Key Takeaways
- Raw scans are rarely production-ready: Photogrammetry creates high-density meshes that crash web browsers and lag game engines, requiring manual or semi-automated retopology to reduce polygon counts.
- UV mapping determines texture quality: Scans often have messy or overlapping texture coordinates; unwrapping creates a clean 2D layout that allows for crisp, high-resolution textures without distortion.
- Optimization drives performance: Properly retopologized models load faster, render smoother on mobile devices and allow for real-time interactivity like 360-degree spins and AR integration.
- The workflow is iterative: The process involves scanning, cleaning, retopologizing, unwrapping, baking and texturing, often requiring multiple passes to balance visual fidelity with file size.
- Tools vary by need: While software like Blender and Maya offer robust manual tools, automated solutions within ZBrush or specialized plugins can speed up the pipeline for large ecommerce catalogs.
Why Do Raw Photogrammetry Scans Fail in Web and Game Engines?
When a team captures a physical product using photogrammetry, the immediate result is often visually impressive. The scan captures every detail, texture and imperfection of the object. However, this visual fidelity comes at a steep computational cost. The raw output from software like Metashape, Reality Capture or Zephyr is a dense point cloud converted into a mesh with a very high polygon count. These triangles are often irregular, overlapping and lack a logical structure.
For a static image on a high-end workstation, this density is manageable. But when attempting to load such an asset into a web browser via a viewer like Three.js or into a game engine like Unity or Unreal Engine, the system struggles. Most modern web browsers have strict memory limits for …strict memory limits for WebGL contexts (per the Khronos Group’s WebGL specification). When a model exceeds these limits, the page crashes, textures fail to load or the frame rate drops to an unplayable level.
The geometry in a raw scan is also topologically chaotic. Unlike a 3D model created from scratch in Blender or Maya, where edge loops follow the natural form of the object, a scan’s mesh is a jagged collection of triangles that follow the light and shadow patterns of the capture environment. This lack of structure makes it impossible to animate the model. If you try to deform a raw scan say, to make a character blink or a product part open the mesh tears and distorts violently because the underlying wireframe does not support deformation.
Furthermore, raw scans often contain “noise,” including floating geometry, holes and internal faces that consume processing power. In an ecommerce setting, where a customer might view a product on a 4G connection or an older smartphone, these inefficiencies are detrimental to the user experience. A slow-loading 3D model leads to high bounce rates. Customers do not wait for heavy assets to render; they simply close the tab.
To make a scanned asset usable, it must undergo transformation. It needs to be stripped of unnecessary data, restructured into a clean mesh and given a proper coordinate system for textures. This is where retopology and UV unwrapping enter the workflow. They are not optional polish steps; they are the bridge between raw data capture and a functional digital asset.
What Is Retopology and Why Is It Necessary for Optimization?
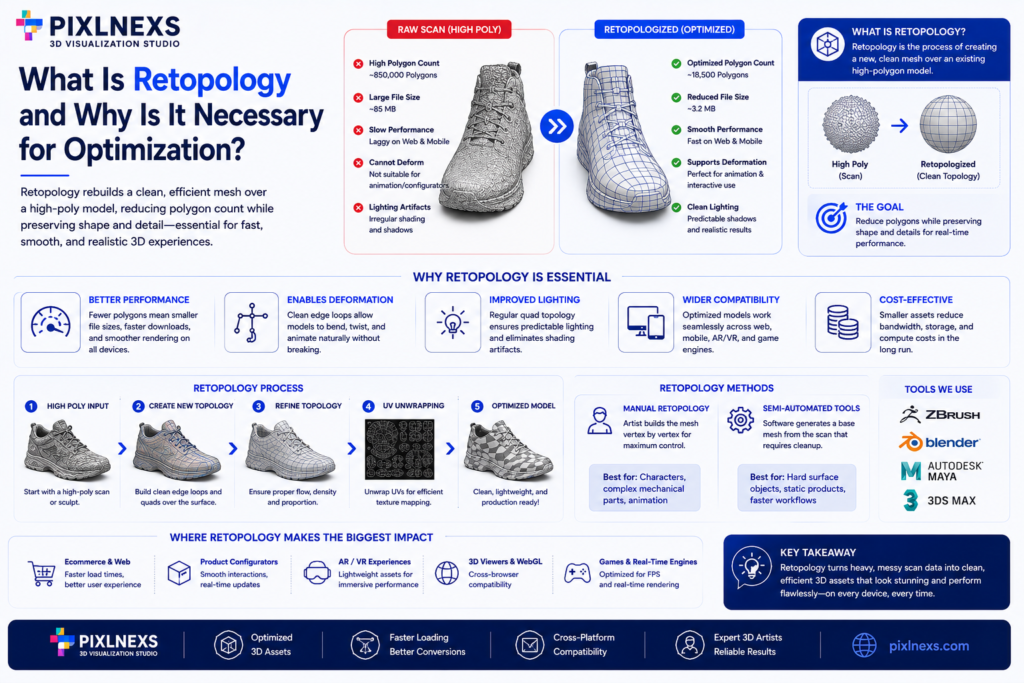
Retopology is the process of creating a new, clean mesh over the surface of an existing high-polygon model. The goal is to reduce the polygon count while preserving the visual shape and details of the original scan. Think of it as rebuilding the skeleton of the object. In a raw scan, the skeleton is a tangled mess of wires. In a retopologized model, the wires are organized into neat loops and quads (four-sided polygons) that flow with the form of the object.
Why is this necessary? The primary reason is performance. Web browsers and mobile devices have limited processing power compared to high-end desktop workstations. A raw scan of a shoe might have hundreds of thousands of polygons. A retopologized version of that same shoe might only need a fraction of that to look identical on screen. This significant reduction in geometry data means the file size drops, allowing for faster downloads and smoother rendering.
Beyond file size, retopology enables deformation. If your ecommerce site includes a configurator where a user can open a laptop lid or bend a flexible product, the mesh must be able to bend without breaking. A raw scan cannot do this. The triangles are too small and irregular to support the mathematical calculations required for animation. A retopologized mesh, with its clean edge loops, allows the model to bend, twist and stretch naturally.
Retopology also improves the quality of shadows and lighting. In game engines and 3D viewers, lighting calculations are based on the normals of the polygons. Irregular, jagged triangles from a scan can cause lighting artifacts, such as dark spots or flickering shadows, even when the texture looks fine. A clean mesh ensures that light interacts with the surface predictably, resulting in a more realistic and professional appearance.
The process of retopology can be manual or semi-automated. Manual retopology involves an artist placing new vertices and edges over the high-poly model, piece by piece. This offers the highest level of control and is essential for characters or complex mechanical parts that require specific edge flow for animation. Semi-automated tools, found in software like ZBrush, Blender or Maya, can generate a new mesh based on the shape of the original. While faster, these tools often require manual cleanup to fix errors and ensure the topology is truly clean.
For ecommerce, the level of retopology required depends on the use case. A static 360-degree view of a product might tolerate a slightly higher polygon count than an interactive AR experience. However, the principle remains the same: the geometry must be efficient. A model that is too heavy will fail to load on many devices, rendering the investment in scanning useless. By retopologizing, you ensure that the asset works across the widest range of devices, from high-end desktops to budget smartphones.
How Does UV Unwrapping Transform 3D Geometry into a 2D Texture Map?
Once the geometry is optimized through retopology, the next critical step is UV unwrapping. If retopology is about the skeleton, UV unwrapping is about defining how the skin (the texture) fits onto that skeleton. The term “UV” refers to the 2D coordinate system used to map a 3D surface onto a 2D image. While 3D space uses X, Y and Z coordinates, the 2D texture space uses U (horizontal) and V (vertical) coordinates.
In a raw photogrammetry scan, the texture is often baked directly onto the mesh in a way that follows the chaotic geometry of the scan. This results in a texture map that is stretched, distorted or has seams in illogical places. If you try to apply a new texture or edit the existing one, the results are often unusable. The texture might appear stretched in some areas and compressed in others, leading to a loss of detail and a blurry appearance.
UV unwrapping solves this by “cutting” the 3D mesh along specific lines (seams) and laying it flat on a 2D plane, like peeling the label off a soda can and laying it flat on a table. This creates a UV map, which is a 2D representation of the 3D object. This 2D layout is then used to paint or project textures onto the object. A well-UV’d model ensures that the texture pixels (texels) are distributed evenly across the surface. This means that a high-resolution texture will look crisp and detailed everywhere on the model, rather than being blurry in some areas and pixelated in others.
The importance of UV unwrapping for ecommerce cannot be overstated. Customers expect high-quality visuals. If a texture is stretched, the product looks cheap and unprofessional. For example, if you are scanning a pair of sneakers, the pattern on the fabric needs to look consistent. If the UV map is poorly constructed, the pattern might stretch across the toe box, making the fabric look distorted. Proper unwrapping ensures that the texture resolution is uniform, preserving the intricate details of the product.
UV unwrapping also allows for the use of normal maps and other advanced texture types. A normal map simulates surface detail (like bumps, scratches and grooves) without adding extra geometry. This is crucial for web performance, as it allows a low-poly model to look as detailed as a high-poly one. However, normal maps only work correctly if the UV map is clean and has no overlapping islands or distortions. If the UVs are messy, the normal map will generate artifacts, creating strange visual noise on the surface of the model.
The process of unwrapping involves deciding where to place the seams. These are the cuts where the 3D surface is split to lay flat. Placing seams in invisible areas, such as under a product or along natural folds, ensures they are not visible in the final render. The goal is to minimize the number of seams while maximizing the efficiency of the UV space. Every pixel in the UV map should be utilized effectively to avoid wasting texture resolution.
In the context of photogrammetry, the initial UVs generated by the scanning software are often a starting point but rarely the final solution. They are optimized for the capture process, not for rendering or texturing. Re-UVing a retopologized model allows for a completely fresh and optimized layout. This is especially important when creating assets for a large catalogue, where consistency across different products is key. A standardized UV workflow ensures that all products in a store have similar texture quality and performance characteristics.
What Are the Best Practices for Retopologizing Scanned Assets Efficiently?
Retopology is a time-consuming process and efficiency is key, especially when dealing with large volumes of products for an ecommerce store. The best practices revolve around balancing manual control with automation, maintaining a logical workflow and focusing on the end-use of the model.
First, always start with a clean base. Before beginning retopology, ensure the raw scan is cleaned of floating geometry, holes are filled and non-essential details are removed. Working with a messy scan makes the retopology process significantly harder. Tools like MeshLab or the cleanup features in ZBrush are useful here. Once the scan is prepped, decide on the target polygon count. For web and mobile AR, a target range is often sufficient for medium-sized products. For complex characters or high-end cinematic renders, the count can be higher but for standard ecommerce, keeping it low is the priority.
The next step is choosing the right tool. Blender is a powerful, free option that offers a robust suite of retopology tools, including the “Shrinkwrap” modifier and manual extrusion. Maya and 3ds Max are industry standards with advanced tools like Quad Draw (in Maya) that streamline the process. ZBrush’s ZRemesher is excellent for automated retopology, though it often requires manual cleanup. The choice depends on the team’s existing skill set and budget. For a studio like Pixlnexs, having a mix of automated and manual tools allows for flexibility. Automated tools handle the bulk of the work, while manual techniques refine the critical areas.
A crucial best practice is to pay attention to edge flow. Edge loops should follow the contours of the object. For a cylindrical object like a bottle, the loops should run horizontally around the cylinder. For a character, loops should follow the muscles and joints. This ensures that the model deforms correctly if animation is needed later. Even if the model is static, good edge flow makes the shading look smoother and more natural.
Another important practice is to use quads (four-sided polygons) whenever possible. While triangles are acceptable in the final render, quads are easier to work with during the modeling process and generally produce better results when subdividing or deforming. Most retopology tools are designed to work with quads and sticking to them reduces the likelihood of artifacts.
When dealing with high-frequency details like fabric texture or rough surfaces, do not try to model every bump into the geometry. Instead, rely on normal maps. Retopology should focus on the large shapes and silhouettes. The fine details are baked from the high-poly scan onto the low-poly retopologized mesh. This approach keeps the geometry light while maintaining visual fidelity.
Finally, establish a consistent naming and file organization system. When working with hundreds of products, it is easy to lose track of versions. Use clear naming conventions for high-poly, low-poly and texture files. This ensures that the pipeline remains organized and that assets can be easily updated or swapped out in the future.
How Do You Create Clean UV Maps for Complex Geometries?
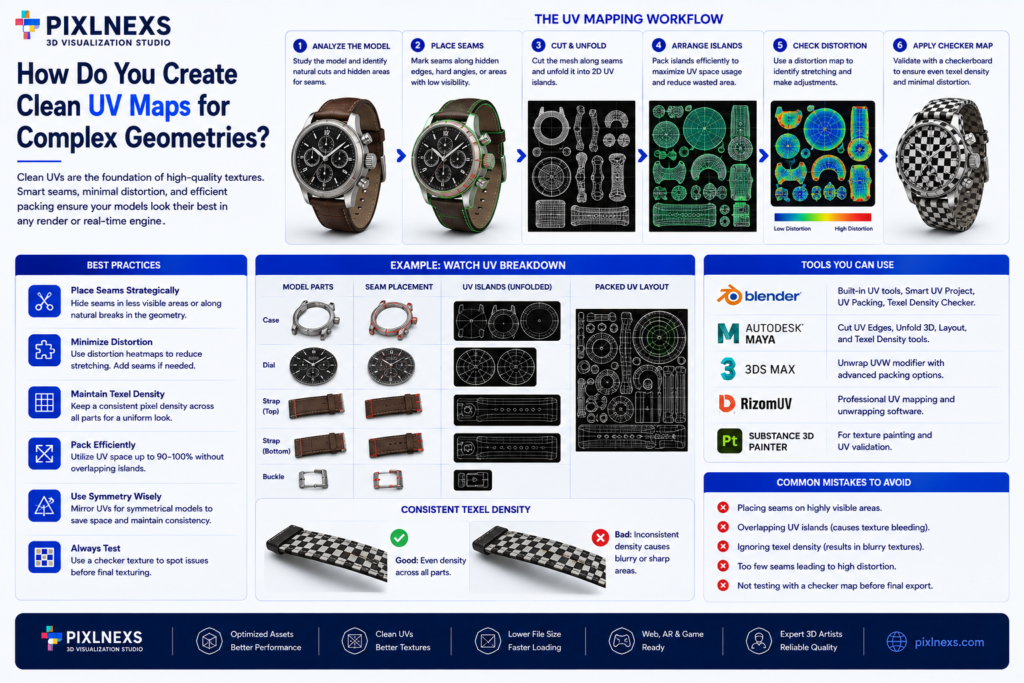
Creating clean UV maps for complex geometries requires a strategic approach to seam placement and island organization. The goal is to maximize the use of UV space while minimizing visible seams and distortion.
The first step is identifying natural seams. Look for areas on the object that are hidden from view or where the shape naturally changes direction. For a product like a watch, seams might be placed on the back of the case, the underside of the strap or along the side of the dial. For a character, seams are typically placed along the inner arms, legs and back. The idea is to hide the cuts where they are least likely to be noticed by the user.
Once the seams are decided, the next step is to cut the mesh and unfold it. This creates “UV islands,” which are the separate pieces of the mesh laid out on the 2D plane. It is important to arrange these islands efficiently to minimize wasted space. A common technique is to pack the islands tightly, like a puzzle, ensuring that the maximum amount of texture resolution is used for the visible parts of the model.
Distortion is a major concern. When a 3D surface is flattened, some stretching is inevitable. The goal is to minimize this stretching. Most 3D software provides tools to visualize distortion, often using a color map where blue indicates low distortion and red indicates high distortion. By adjusting the seams and the layout, you can reduce the red areas. For complex shapes, it may be necessary to add more seams to reduce stretching.
Another best practice is to maintain consistent texel density. This means that the ratio of pixels to 3D surface area should be the same across all parts of the model. If one part of the model has a high texel density (very detailed) and another has a low density (blurry) the result will look inconsistent. Most software allows you to set a target texel density and automatically scale the UV islands to match.
For ecommerce, it is also important to consider the texture atlas. In many cases, multiple objects in a scene (like a full product setup) are placed on a single texture map to reduce draw calls. This requires careful planning of the UV layout to ensure that all parts fit within the texture boundaries without overlapping. Overlapping UVs can cause rendering errors where one part of the model shows the texture of another part.
When dealing with symmetrical objects, it is often efficient to UV only one half and then mirror the UVs. This saves time and ensures that the texture is perfectly symmetrical. However, care must be taken to ensure that the seam down the center is handled correctly to avoid visible artifacts.
Finally, always test the UV map with a checkerboard texture. This is a simple grid pattern that reveals distortions immediately. If the squares are stretched or distorted, the UV map needs adjustment. A perfect UV map will show uniform squares across the entire surface.
What Are the Common Pitfalls When Converting Scans to Production Assets?
Converting raw scans into production-ready assets is fraught with potential pitfalls that can ruin the final result. One of the most common mistakes is ignoring the topology requirements for the target platform. Teams often retopologize a model for a desktop game engine and then try to use it on a mobile web viewer without adjusting the polygon count. The result is a model that loads slowly or crashes the browser. It is essential to define the target platform early in the process and optimize the assets accordingly.
Another frequent error is poor seam placement. If seams are placed in visible areas, they can create visible lines in the texture, breaking the illusion of a continuous surface. This is particularly noticeable on smooth surfaces like metal or plastic. Even if the geometry is clean, a visible seam can make the product look cheap.
Texture baking is another area where things can go wrong. Baking the high-poly details onto the low-poly mesh requires precise alignment. If the low-poly mesh does not perfectly match the shape of the high-poly scan, the baking process can result in “shadow acne” or “light leaks,” where the texture appears to have strange dark or light spots. This often happens if the low-poly mesh is too far away from the high-poly surface during the bake.
Over-reliance on automation is also a pitfall. While automated retopology and UV tools are fast, they often produce suboptimal results for complex shapes. They may create unnecessary edges, poor island layouts or topology that is difficult to animate. A purely automated workflow can save time in the short term but often leads to more problems later, requiring manual fixes that take even longer.
Finally, neglecting the file size is a critical error. Even if the model looks good, if the file size is too large, it will not perform well on the web. Teams sometimes focus too much on visual fidelity and forget to compress textures, optimize the mesh or use efficient file formats like glTF or Draco compression. This leads to slow load times and a poor user experience.
How Does This Workflow Compare to Traditional 3D Modeling for Ecommerce?
The workflow for scanning and optimizing a product differs significantly from traditional 3D modeling. In traditional modeling, an artist creates the geometry from scratch using primitives and modifiers. The topology is built intentionally, with clean edge loops and efficient UVs from the start. The artist has full control over the shape and the texture coordinates.
In contrast, the scanning workflow starts with a chaotic, high-density mesh. The artist must work backward, analyzing the shape and rebuilding it. This requires a different set of skills and a different mindset. Instead of creating form, the artist is interpreting and simplifying existing form. The challenge is to capture the essence of the original object without the unnecessary data.
However, the end result can be superior in terms of realism. A scanned model captures the exact imperfections and textures of the physical object, which is difficult to replicate manually. For products where authenticity is key, such as vintage items or complex textures, scanning is often the only way to achieve the desired look.
The time investment also differs. Traditional modeling can be faster for simple, geometric objects. For complex, organic shapes, scanning can be faster than modeling from scratch, provided the retopology and texturing pipeline is efficient. However, the post-processing steps (retopology and UV unwrapping) add a significant amount of time to the scanning workflow. A scanned object might take considerably longer to prepare for the web than a simple modeled object.
Despite these differences, the goal is the same: a clean, optimized asset that looks great and performs well. Both workflows require a deep understanding of topology, UV mapping and texture baking. In fact, the skills learned in traditional modeling are directly applicable to the retopology of scanned assets. Many studios use a hybrid approach, scanning the base shape and then manually modeling the details or fixing the topology to ensure the best possible result.
For ecommerce, the choice between scanning and modeling often comes down to the specific product and the available resources. If the product already exists physically and needs to be digitized quickly, scanning is the way to go. If the product is a new design that does not exist yet, traditional modeling is the only option.
Can Automated Tools Replace Manual Retopology and UV Unwrapping?
The rise of AI and automated tools has led many to ask if manual retopology and UV unwrapping are still necessary. The short answer is no, not entirely. While automated tools have made significant strides, they cannot yet replace the nuanced decision-making of a skilled artist.
Automated retopology tools, such as ZRemesher in ZBrush or the Quad Remesher plugin, can generate a clean mesh in seconds. They are excellent for getting a quick result or for assets that do not require animation. However, these tools often struggle with complex geometries, sharp edges and specific deformation requirements. They may place edge loops in illogical places or fail to capture subtle details.
Similarly, automated UV tools can generate a UV layout quickly. But they often create messy island arrangements, excessive seams or distorted UVs that require manual cleanup. For high-quality ecommerce assets, where every pixel counts, these imperfections are unacceptable.
The role of the artist has shifted from doing the grunt work to overseeing the process. Instead of placing every vertex by hand, the artist sets up the parameters for the automated tool, runs the process and then refines the result. This hybrid approach is the most efficient. It leverages the speed of automation while maintaining the quality of manual work.
For large-scale projects, such as scanning an entire product catalogue, automation is essential. It is impossible to manually retopologize thousands of products. In these cases, a pipeline is built where automated tools handle the bulk of the work and artists focus on the critical assets that require the highest level of quality.
Ultimately, the choice depends on the project requirements. For a quick prototype or a low-priority asset, automation is sufficient. For a flagship product or a high-end interactive experience, manual intervention is necessary to ensure the best possible result. The best studios use a combination of both, leveraging technology to speed up the workflow while relying on human expertise to ensure quality.
Elevate Your Product Visualization with Interactive 3D & AR
Ready to bring your scanned models to life and enhance your online store? Pixlnexs can help you create immersive shopping experiences with cutting-edge 3D and AR technology. Transform your product displays with Pixlnexs and stay ahead of the curve.
Need production-ready 3D assets, not just raw scans?
Pixlnexs handles retopology, UV unwrapping and optimization end-to-end for ecommerce catalogs.
Get a quote for your product catalogFrequently Asked Questions
What is the difference between retopology and decimation?
Retopology creates a new mesh with clean, efficient topology built for animation and deformation. Decimation just reduces polygon count by merging vertices, without restructuring the mesh faster but messier.
How do I know if my UV map is good enough for web use?
Check for minimal distortion using a checkerboard texture test, confirm seams are hidden and verify texel density is consistent across the model.
Can I skip retopology if I only need a static 3D view?
Technically yes but not recommended raw scans are often too heavy for most browsers even in static view and will slow load times on mobile.
How long does it take to retopologize a scanned product?
A simple object can take under an hour; complex products with intricate detail can take several hours, even with automated tools.
What software is best for retopology and UV unwrapping?
Blender (free) Maya and 3ds Max (industry standard) and ZBrush (automated retopology via ZRemesher) are the most common choices.
Can automated tools fully replace manual retopology and UV unwrapping?
Not entirely. Automated tools like ZRemesher or Quad Remesher speed up the process but they still struggle with complex geometry, sharp edges and deformation needs most studios use automation for the bulk of the work and manual cleanup for critical assets.
Why do normal maps require a clean UV layout?
Normal maps simulate surface detail like bumps and scratches without adding extra geometry but they only render correctly on a UV map with no overlapping islands or distortion messy UVs create visual artifacts and noise.
[Learn more in our guide on 3D scanning and photogrammetry for ecommerce. New to scanning? Try our phone-camera photogrammetry tutorial. For software choice, see Metashape vs RealityCapture vs Zephyr. And if you’re weighing your options, read 3D scanning vs 3D modeling.




Leave a Reply