
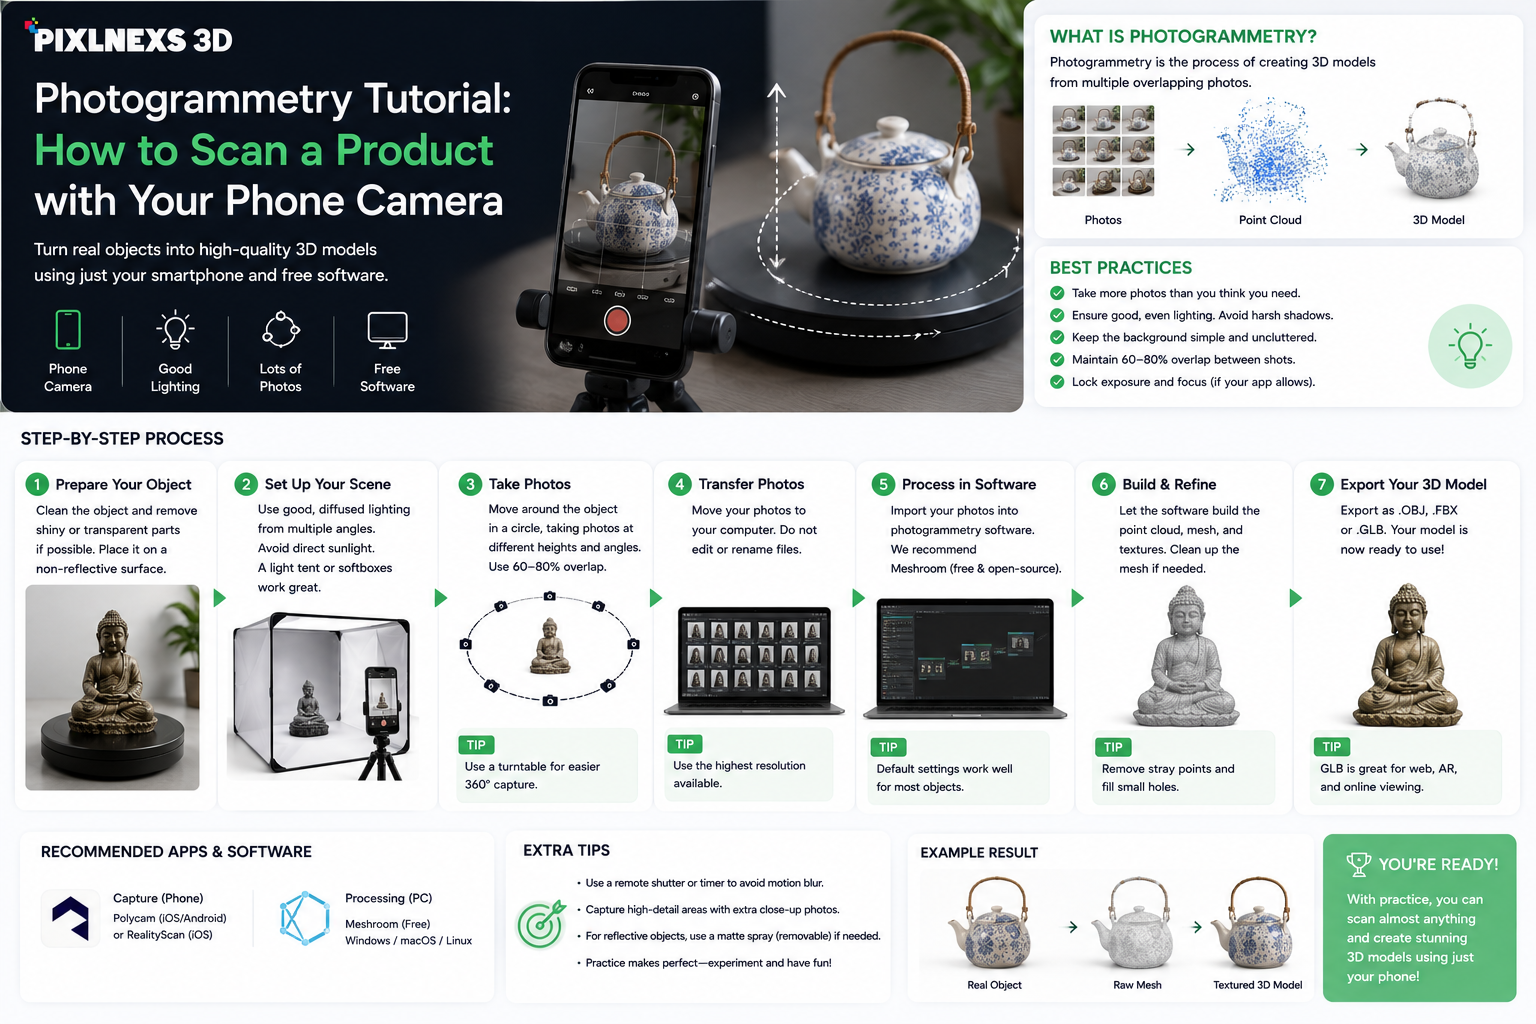
Photogrammetry Tutorial: How to Scan a Product With Phone Camera You don’t need a scanning studio to get a usable 3D model. A phone, decent light and a workflow you stick to will get you there. Photogrammetry is simpler than it sounds: geometry and pattern recognition, nothing more. Your phone shoots dozens of overlapping photos. Software finds matching points across those frames, calculates where the camera stood for each shot and stitches everything into a 3D mesh.
The hardware was never the hard part. Controlling variables like lighting, camera motion and surface texture is where most people trip up. This tutorial deals with preparation of your product for imaging, proper image acquisition, processing using free or cheap software, and cleaning up the results.
No matter whether it is jewelry, cosmetics, handmade products, or anything else, the guidelines remain the same: consistency, patience, and care. When doing online business, the combination of the process described and interactive 3D viewers will provide the customer with an incentive to make use of your scans.
What Hardware and Environment Do You Need?
Forget the camera rig and studio lights. A modern smartphone, a stable surface and some patience gets you there. A phone with a 12MP or higher sensor and autofocus handles this fine. Skip wide angle lenses, since they distort the image in ways that mess with stitching later. Use macro mode for small objects and lock in stabilization, since a tripod or clamp isn’t optional here and motion blur ruins scans fast.
For lighting, soft diffused natural light works well. Direct sunlight doesn’t, since it throws harsh shadows and blown out highlights that confuse the software.
A lightbox or white tent tames reflections and for bigger items, two soft LED panels at 45 degree angles keep light even without glare. For rotation, a lazy Susan or DIY turntable beats doing it by hand, since consistency is the whole point. Aim for smooth rotation in steps of 10 to 15 degrees per shot. Keep your background matte and neutral, since a plain white backdrop cuts down noise in the final mesh while anything patterned can be mistaken for actual geometry.
A few extras help: a tripod mount, a remote shutter or timer to kill motion blur and a coin or ruler in frame for real world scale, though most apps estimate this automatically now.
How Do You Prep the Product Itself?
Surface properties and geometry determine how well your object can be scanned before even picking up your phone. Photogrammetry does not understand shiny, reflective or transparent products that do not have enough visual markers. Matte, textured surface such as wood grain or an embossed logo is what software needs to see. It becomes even more relevant when considering difficult categories such as jewelry with reflective metals and faceted stones.
Clean the product first since dust and fingerprints appear in a mesh as strange bumps and scan loose elements separately.
If you need to scan an object with a smooth surface such as a ceramic mug, create temporary texture on its surface: attach removable stickers, use chalk spray or dust the item with flour. Just a few details will be enough for software to understand it.
Rotate the object during scanning if it is small enough and move your camera around if the object is big enough. Maintain constant distance from it at all times or you will struggle with scale later.
How Do You Capture the Right Photos?
It is here that beginners fail to keep the scan in order. Inconsistently shot and hurried photographs will result in holes and distortion later.
Imagine your object placed in the middle of a sphere and then take several shots from different sides of it. Take the shots starting with the eye level position of the camera and then continue taking them upwards and downwards by 15 degrees.
Always shoot with your phone on the highest resolution and fix the focus before you start.
Use an aperture value that is not too narrow and not too wide, set the white balance manually and use raw files if possible, because the raw format contains more information about shadow and highlights than jpeg.
Here goes the order: a couple of shots taken from the top, then 24-36 photos taken in turns of 15 degrees around the center of the object and then do the same thing but with a tilt of the circle of shots to 15 and 30 degrees, respectively. Repeat the same for the lower part of the object.
Use the same conditions and parameters of every photo and use a remote shutter release.
Which Software Should You Use?
Meshroom is free and open-source software and likely your first choice. It supports Windows, macOS and Linux, uses the node-based approach with a considerable learning curve and can export OBJ, FBX and other standard formats. 3DF Zephyr Free is easier to use, works nicely with phone pictures, automates the processes of alignment and mesh creation but its free version has maximum resolution restrictions.
Polycam and Scaniverse work directly on your phone which is convenient but usually resolution dependent unless you buy subscriptions. RealityCapture has a free plan that offers outstanding quality faster than many other free programs but requires a good GPU.
If we compare such free solutions to professional software like Metashhape, the former becomes not as accurate but much more accessible. You sacrifice the precision but get great ecommerce visuals without spending extra money.
How Do You Turn Photos Into a Mesh?
Once you’ve got your images, the software takes over, running anywhere from minutes to hours depending on image count and hardware.
Most tools start by aligning images automatically, finding common points and estimating camera position for each shot.
If alignment fails, it’s almost always insufficient overlap, bad lighting or an inconsistent background. In Meshroom, drag your images in, set an output folder and let Prepare and Feature Extraction run first. In Zephyr, import photos, set your camera count and run alignment. In Polycam, select your images and tap Process and it handles alignment in the cloud.
Next comes the dense cloud and mesh, where the software builds geometry by matching features across every image, then texturing, where the photos get projected onto the 3D surface. Quality here depends entirely on your original image resolution and lighting consistency.
What Usually Goes Wrong?
Misalignment or drift usually means insufficient overlap or inconsistent lighting, so reshoot the section with tighter rotation steps and better light. Holes or missing geometry come from uniform or reflective surfaces: add temporary texture or reposition your lights, then patch small gaps manually. Noise or fuzzy geometry traces back to blurry images or camera shake, so stabilize your phone and lock focus. Wrong scale means the software misjudged proportions, so include a coin or ruler in frame next time. Texture bleeding happens when overlapping textures don’t line up cleanly, so try reducing image count or increasing overlap.
How Do You Clean Up the Model?
Raw photogrammetry meshes are messy and far too dense for web use, so cleanup isn’t optional if this is going on a product page.
Start by reducing polygon count. Open the mesh in MeshLab or Blender, run Quadric Edge Collapse Decimation and target 50,000 to 200,000 polygons for ecommerce, the sweet spot between detail and file size. Our breakdown of low poly versus high poly 3D models explains exactly where that trade off matters most for web performance.
Then repair the geometry: fill holes with MeshLab’s Close Holes tool, smooth sharp edges with Taubin Smooth and clear out non manifold edges and duplicate vertices.
UV unwrapping matters more than people expect for texture accuracy. Once you have selected the mesh in Blender, go to Edit Mode, mark seams on the mesh, and unwrap using Smart UV Project. Even after all of this if the textures are still looking fuzzy, you will need to render them at a higher resolution or fix them manually using Photoshop.
How Do You Export and Prep for Ecommerce?
GLTF/ GLB file format is ideal for the purpose of interactive uses as it contains textures and animations. The FBX file format is ideal when there is cross-platform portability as it contains the hierarchy and materials intact. The OBJ file format is straightforward and universal, though not supporting any animation. For using AR in Apple gadgets, conversion of GLB files to USDZ format will also become necessary due to the limitations of iOS Quick Look.
For optimization, reduce the number of polygons, compress textures into 2k or 4k and use PBR material. This will make the final step of integration which is uploading to the platform and checking for rendering on mobile/desktop and proper reactions to actions such as color swap or zooming.
Phone Scanning Versus Dedicated Scanners
Phone based scanning isn’t a replacement for structured light or laser scanners but for most ecommerce needs, it’s the more practical choice.
Dedicated scanners hit sub millimeter precision on complex geometry, while phone photogrammetry lands around millimeter level, plenty for product visualization but not precision engineering. A structured light scanner produces a mesh in minutes, while phone scanning takes longer through capture and processing, though you can do it anywhere without specialized gear.
A scanner runs into the thousands while a phone costs hundreds and for most small businesses that gap decides the question outright. Scanners also handle reflective or transparent materials far better, since phones struggle with mirrors and polished metal without a temporary coating.
The bottom line: phone photogrammetry is great for marketing and product pages. Dedicated scanners earn their cost in quality control and manufacturing.
Scan or Model by Hand?
Photogrammetry is fast but hand modeling gives you a level of control scanning can’t match.
Reach for photogrammetry when you need something photorealistic fast or the product has complex surface detail. Reach for hand modeling when the geometry is simple and symmetrical or when the model needs to be animated or rigged later, such as for a game asset. For most catalogs, a hybrid approach wins: photogrammetry for base geometry, hand modeling to clean up and fill in missed details.
What Makes Results Repeatable?
Standardize your setup: same lighting rig, same fixed camera distance, same turntable steps every time. Build a capture checklist covering settings and rotation increments and store raw images in organized folders. Start with a simple product to dial in your technique before scaling up, back everything up and keep multiple versions of a model as you refine it.
Getting Scanned Models Into Your Workflow
On product pages, swap static images for interactive 3D viewers that let people rotate, zoom and inspect the product before buying. This tends to cut return rates and lift engagement, one of the clearest benefits of 3D product visualization for online stores.
Use a scanned model as the base mesh for configurators, like a shoe configurator that starts from a scanned foot and lets users change color. Embed 3D models in campaigns and ads, since interactive content pulls higher click through than static images. For AR, let customers preview products in their own space, which does more for buyer confidence than another photo, especially for fashion and apparel where fit is hard to judge from photos alone.
Scaling Across a Whole Catalog
Going from one product to dozens takes automation and a trained team, not just repeating the manual process more times. Use scripting in Meshroom or Zephyr to batch process projects and build templates for lighting and output formats so nobody’s reinventing the workflow each time. Train your team, put together a style guide and build in quality control, reviewing every model for geometry errors and scale accuracy before it goes live.
Frequently Asked Questions
Can I really get usable 3D models from a phone camera?
Yes. Modern photogrammetry software is built for phone photos. The key is consistent capture, good lighting and enough overlap between images.
What’s the biggest mistake beginners make?
Inconsistent lighting or camera settings between shots. Even a subtle exposure or white balance shift can cause misalignment or blurry textures.
Do I need a turntable or can I just move the camera?
A turntable helps with small objects since it gives smooth, controlled rotation. For larger items, moving the camera in a fixed distance circular path works just as well. What matters is keeping distance and overlap consistent.
How do I handle reflective or transparent objects?
Apply a temporary matte coating, chalk spray or removable stickers so the software has texture to track. For glass, a dark background with backlighting helps create contrast.
Can I use photogrammetry models directly in my online store?
Usually not without optimization first. Raw meshes are too dense or noisy for web use straight out of processing, so clean up the geometry, cut polygon count and compress textures first.
What software should I start with?
Meshroom or 3DF Zephyr Free. Both are free, desktop based and backed by active communities. Once comfortable, branch into Polycam or RealityCapture for higher quality.
How long does scanning and processing take?
Capture runs 10 to 30 minutes depending on complexity. Processing ranges from 15 minutes to several hours for dense models. With practice, a full workflow fits under an hour.
What’s the difference between photogrammetry and 3D modeling?
Photogrammetry builds a model from real world photos, capturing geometry and texture automatically. 3D modeling builds geometry from scratch using digital sculpting or CAD tools. Photogrammetry wins on speed, modeling wins on precision.
Can I use AI tools to enhance photogrammetry results?
Yes. AI upscalers like Topaz Gigapixel AI can boost texture resolution and some software already has AI denoising built in. It helps but it isn’t a substitute for careful capture.
What’s the best way to share 3D models with clients or team members?
Export to GLB or GLTF for web sharing or FBX for collaboration inside 3D tools. Platforms like Sketchfab or Vectary let you embed interactive viewers directly in emails or documents.









Leave a Reply