
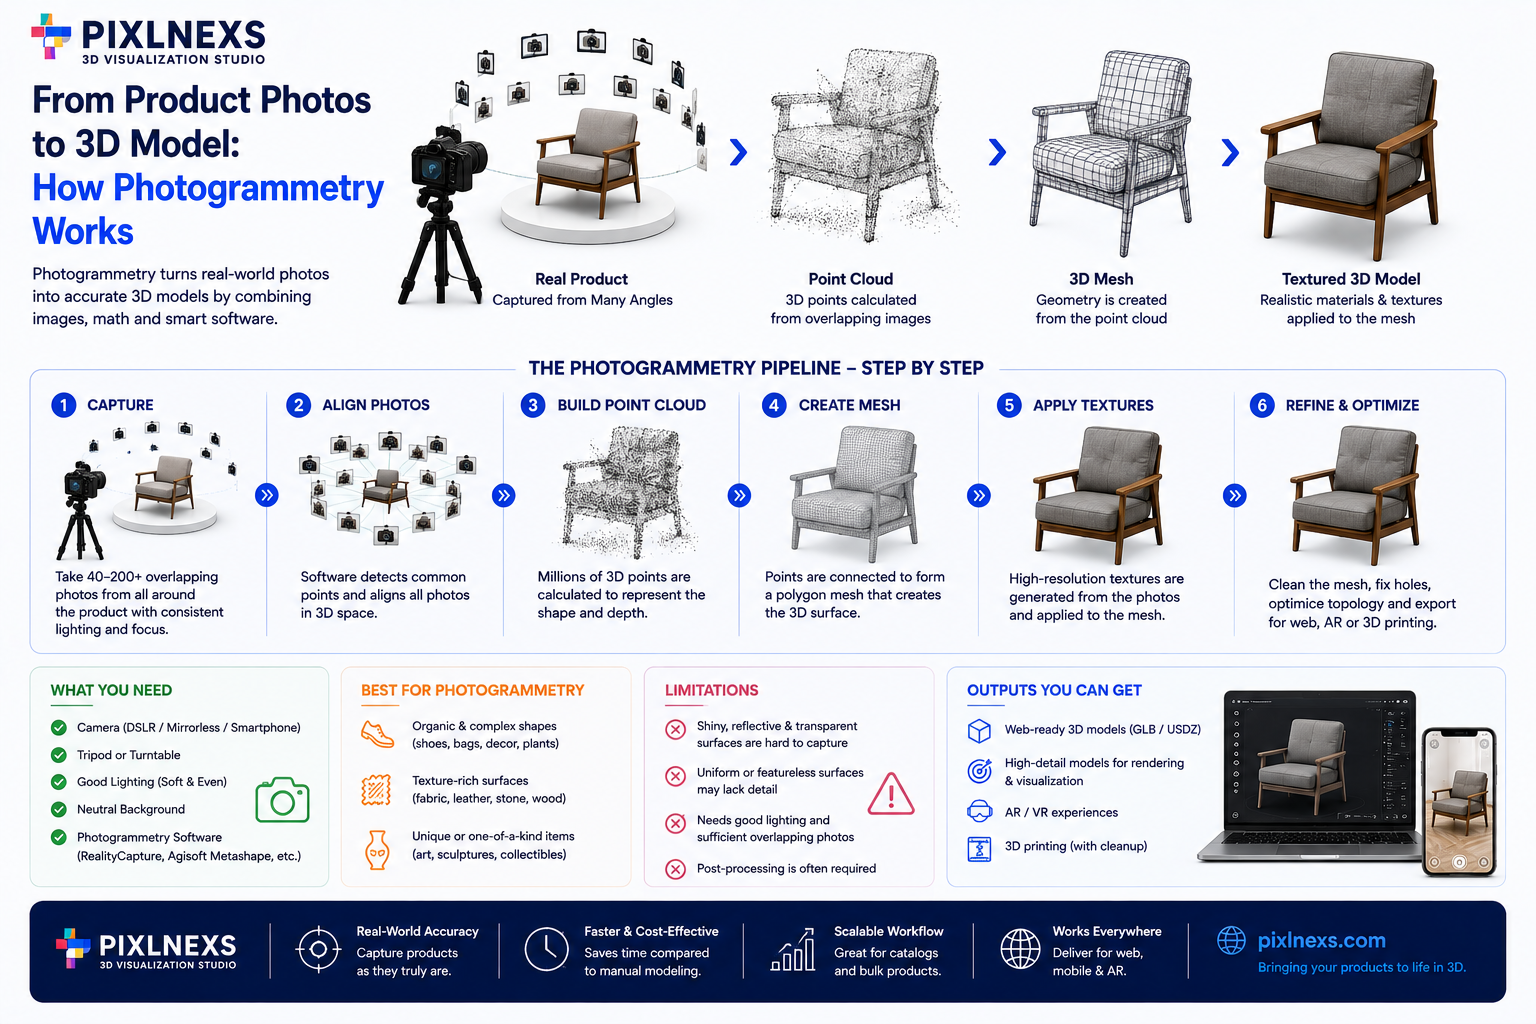
Quick Answer: Photogrammetry turns dozens of overlapping product photos into an accurate, textured 3D model by triangulating the same surface points across many camera angles. For ecommerce teams, it is one of the fastest ways to capture a real product as a web-ready photogrammetry 3D model for ecommerce, without modeling every detail by hand.
Pixlnexs captures and optimizes photogrammetry scans into web-ready 3D models for ecommerce brands every week, from turntable capture through retopology and GLB/USDZ export.
Key takeaways
- It is reconstruction, not magic. Photogrammetry rebuilds geometry from real photos, so the output is only as good as the capture set.
- Overlap is the whole game. Every surface should appear in several frames from different angles, usually 40 to 120 shots for a product.
- Texture-rich, matte items win. Leather, wood, fabric, ceramics and food capture beautifully; shiny, transparent or pure-black surfaces fight back.
- Raw scans are not final assets. Cleanup, retopology and web optimisation (GLB/USDZ) sit between the scan and a usable model.
- It is one route, not the only one. Manual modelling still wins for hard-surface and reflective products.
What photogrammetry actually is
At its core, photogrammetry is a measurement technique. Software studies a set of overlapping photographs, finds features that appear in more than one image and works backwards from how those features shift between frames to figure out where each point sits in 3D space. The result is a dense point cloud, which is then converted into a mesh and wrapped with a texture lifted from your own photos.
Because the colour and surface detail come straight from real images, the look is grounded in the physical product rather than an artist’s interpretation. That is the main reason brands choose it over building geometry from scratch. If you are still weighing capture-based 3D against flat imagery, our breakdown of 3D product visualization versus product photography covers where each one earns its place.
The photogrammetry process, step by step
1. Capture setup for clean photogrammetry
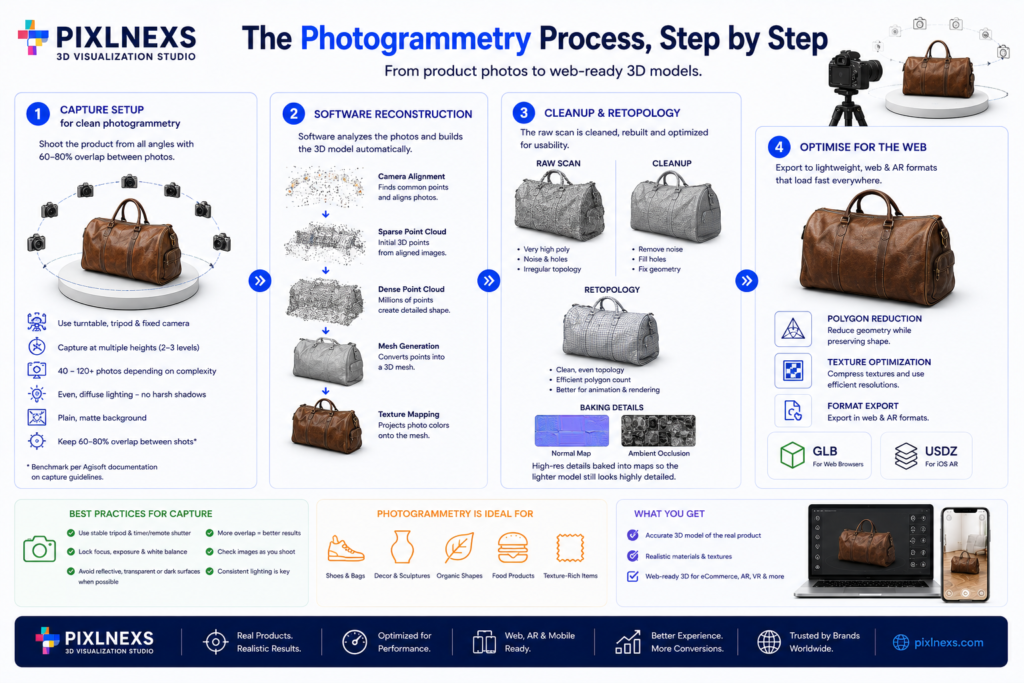
Capture is where most projects are won or lost. We place the product on a turntable, lock the camera on a tripod and shoot a full rotation at fixed increments, then repeat from two or three heights to cover the top and underside. Even, diffuse lighting is essential, because hard shadows and hot spots get baked into the model as if they were real surface detail.
The non-negotiable rule is overlap: each photo should share roughly 60 to 80 percent of its content with the next. A small product usually needs 40 to 120 frames; complex shapes need more. We keep the background plain and matte so the software is not distracted by reflections or moving context.
a widely used benchmark in photogrammetry workflows, per Agisoft’s documentation on capture guidelines.
2. Software reconstruction
Once the images are in, the software aligns the cameras, builds a sparse then dense point cloud, generates a mesh from those points and finally projects the photo colours back onto the surface as a texture. This stage is largely automated but it is unforgiving of a weak capture set. Missing angles show up as holes; blurry frames show up as noise.
3. Cleanup and retopology
A raw scan is dense, messy and far too heavy for a website. Our artists fill holes, remove stray geometry and rebuild the surface with clean, even polygons in a step called retopology. We also bake the fine detail from the high-resolution scan into normal and texture maps so the lighter model still reads as detailed.
4. Optimise for the web
The cleaned model is then exported to web and AR formats, typically GLB for browsers and USDZ for iOS AR. This means compressing geometry and textures so the asset loads fast without looking broken. If you want the technical side, we cover how to optimise 3D models without losing quality and explain what a GLB file is and why it became the ecommerce standard.
When photogrammetry is the right choice
Photogrammetry shines on products with dense, natural texture and predictable, matte surfaces. It struggles, sometimes badly, with anything that breaks the assumption that a surface point looks the same from every angle. Reflective chrome, clear glass, polished plastic and deep-black materials all confuse the matching step, because the surface changes appearance as the camera moves.
| Product type | Photogrammetry fit | Better with manual modeling? |
|---|---|---|
| Leather bag, wooden decor, fabric | Excellent | No |
| Ceramics, food, cosmetics packaging (matte) | Strong | No |
| Glossy plastic, painted metal | Workable with prep | Sometimes |
| Chrome, glass, jewelry, pure black | Poor | Yes |
For the harder cases, a 3D artist building geometry by hand often delivers a cleaner, more controllable result. We compare the approaches, including faster AI-assisted methods, in our look at manual versus AI 3D models for ecommerce. Budget plays a role too and our guide on how much 3D product rendering costs sets realistic expectations.
Practical capture tips and honest limitations
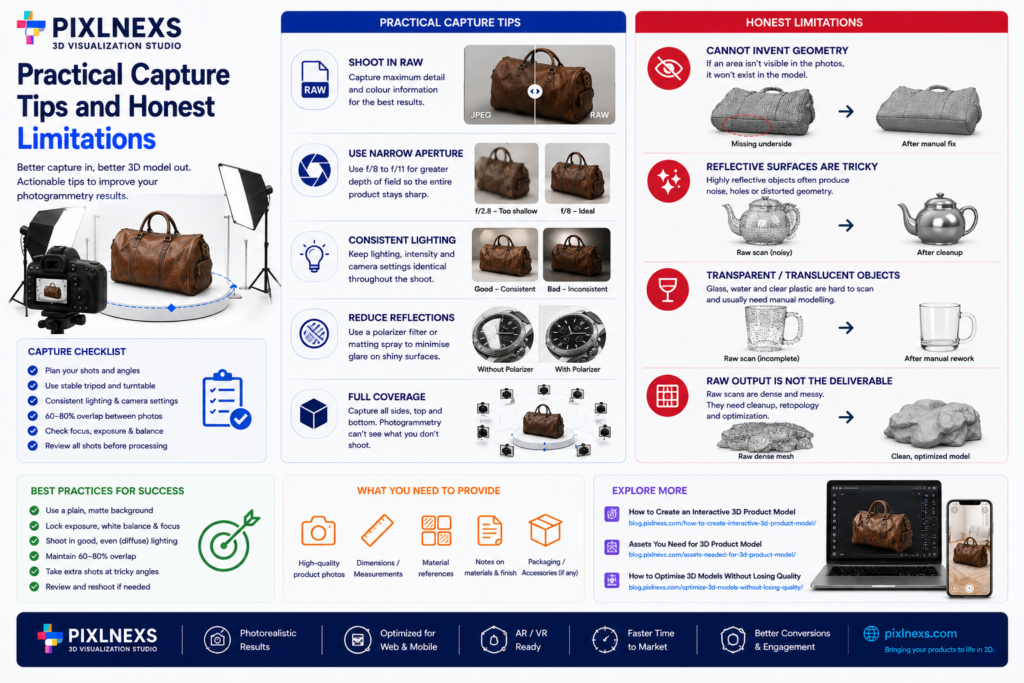
If you are capturing in-house, a few habits raise your hit rate sharply. Shoot in RAW for maximum detail, keep the aperture narrow so the whole product stays in focus and never move the lighting between frames. For shiny products, a light dusting of matting spray or a polarizing filter can tame reflections enough to get a usable scan.
We stay honest about the limits. Photogrammetry cannot invent geometry it never saw, so hidden cavities and undersides need deliberate coverage. Transparent and mirror-like parts almost always need manual rework. And the raw output is never the deliverable; the value sits in the cleanup and optimization that follow. To see where this fits in the bigger picture, our hub on creating an interactive 3D product model walks the full process end to end and our list of assets you need to provide shows exactly what to gather before a project starts.
Have a product ready to scan?
Pixlnexs captures, cleans up and optimizes photogrammetry scans into fast-loading, web-ready 3D models.
Get a quote for your productFrequently asked questions
How many photos does photogrammetry need?
For a typical product, plan on 40 to 120 overlapping photos, with simpler shapes needing fewer and intricate items needing more. The goal is full coverage with 60 to 80 percent overlap between frames, not a fixed number, so prioritize gaps in coverage over hitting a target count.
Can photogrammetry handle shiny or transparent products?
Not well on its own. Reflective and transparent surfaces change appearance as the camera moves, which breaks the point-matching the technique relies on. A matting spray or polarising filter helps but for glass, chrome and jewelry, manual modelling is usually the safer route.
Is a photogrammetry scan ready to use straight away?
No. A raw scan is heavy and messy, so it needs cleanup, retopology and export to web formats like GLB and USDZ before it works on a product page. That post-processing is where most of the craft and the final quality, actually lives.
How do I prepare a product for a photogrammetry shoot?
Clean the product, plan coverage of every angle including the underside and arrange even, shadow-free lighting. Sharing reference notes and any tricky details up front saves a reshoot; our u003ca href=u0022https://blog.pixlnexs.com/how-to-brief-a-3d-studio-checklist/u0022u003echecklist for briefing a 3D studiou003c/au003e covers what to send before work begins.
What equipment do I need for product photogrammetry?
A DSLR or mirrorless camera, a tripod, a turntable and diffuse even lighting are the essentials a polarizing filter helps with semi-reflective surfaces.
How much does a photogrammetry scan cost compared to manual modeling?
Photogrammetry is often faster and cheaper for texture-rich, matte products, while manual modeling tends to cost more in artist hours but suits hard-surface or reflective items better.
Written by the Pixlnexs 3D team, who capture and optimise product scans for ecommerce every week. Tell us about your product and we will advise whether photogrammetry or manual modelling fits best in our guide to creating an interactive 3D product model.








Leave a Reply