Quick answer: To create talking head AI video without a camera, You create a small script, select the avatar (it can be stock or custom avatar), put your script or voiceover, and allow a text-to-video algorithm to synchronize the avatar with speech synthesis. The whole process is software only, no studio, no lighting, no shooting needed. Modern tools generate a high-quality 1080p video within minutes, allowing for quick editing through changing of the script and rerendering of the video. The downside: the quality of your video is highly dependent on script precision, voice choice, and correction of pronunciation and speech pace.
The Pixlnexs Animation Studio team creates AI videos and 3D content and operates marketplace for our videos at store.pixlnexs.com; thus, this article represents practical experience in production.
A talking-head video – the video which shows one person addressing camera – is the most popular business video type out there: onboarding videos, sales explanations, educational courses, products explanation, announcements, etc. This is also the most unpleasant video to shoot. You will need presenter who feels comfortable on camera, soundproof room with good lighting, and willingness to reshoot everything each time you change a sentence in script. AI eliminates all of those requirements. AI takes away all of that. This guide breaks down the whole process of making AI videos step by step, explaining exactly what’s involved in each step and what the issues are in 2026.
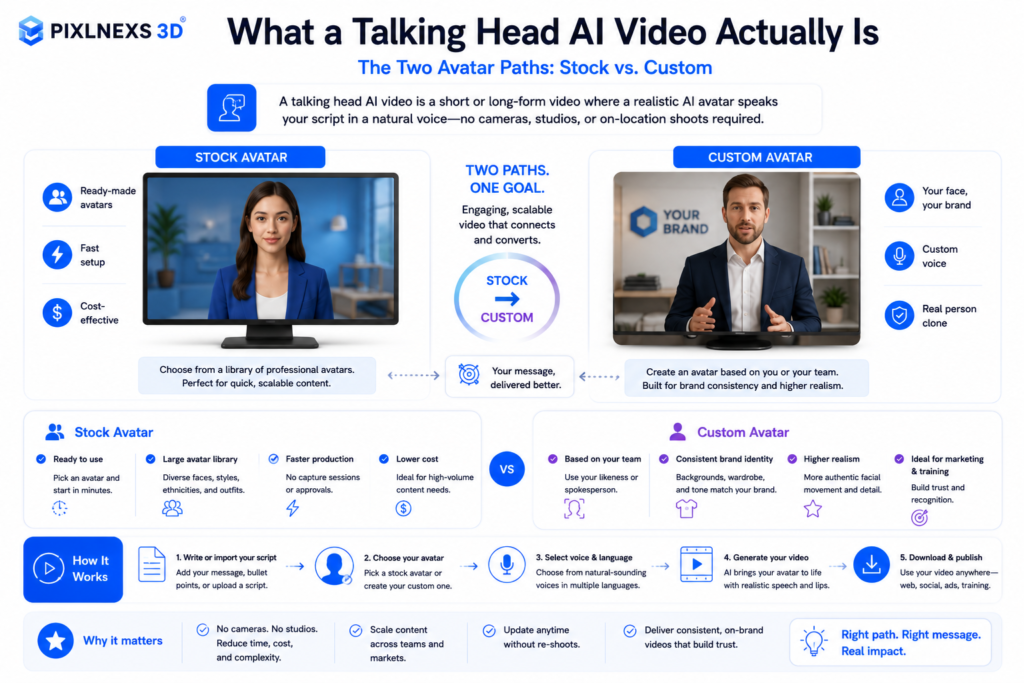
What a talking head AI video actually is
What goes on behind the scenes is that a “talking head” video uses three different machine learning processes: speech synthesis (which converts your script into a voice), the avatar itself (a realistic or cartoon character) and lip sync (that drives the animation of the avatar’s mouth, jaw and head movements to fit the voice). Some software even adds blink cycles and hand gestures for more realistic movement.
You don’t need to understand the models to use them. But knowing the three jobs explains why results vary so much. A clip can have a great voice and stiff lips, or perfect lip-sync and a robotic voice. When you evaluate a tool, judge each layer on its own.
The two avatar paths: stock vs. custom
There are two ways to get a presenter. A stock avatar is a pre-built presenter the platform provides: fast, cheap, and consent-cleared, but other companies use the same faces. A custom avatar is your own likeness (or a hired actor’s), trained from a short consented recording so the presenter is unique to your brand. Custom avatars cost more and take longer to set up, but they pay off for anything customer-facing where brand recognition matters. One thing nobody mentions: once you’ve seen a particular stock face fronting three different SaaS ads in your own feed, you can’t unsee it, and neither can your prospects.
Step-by-step: create talking head AI video
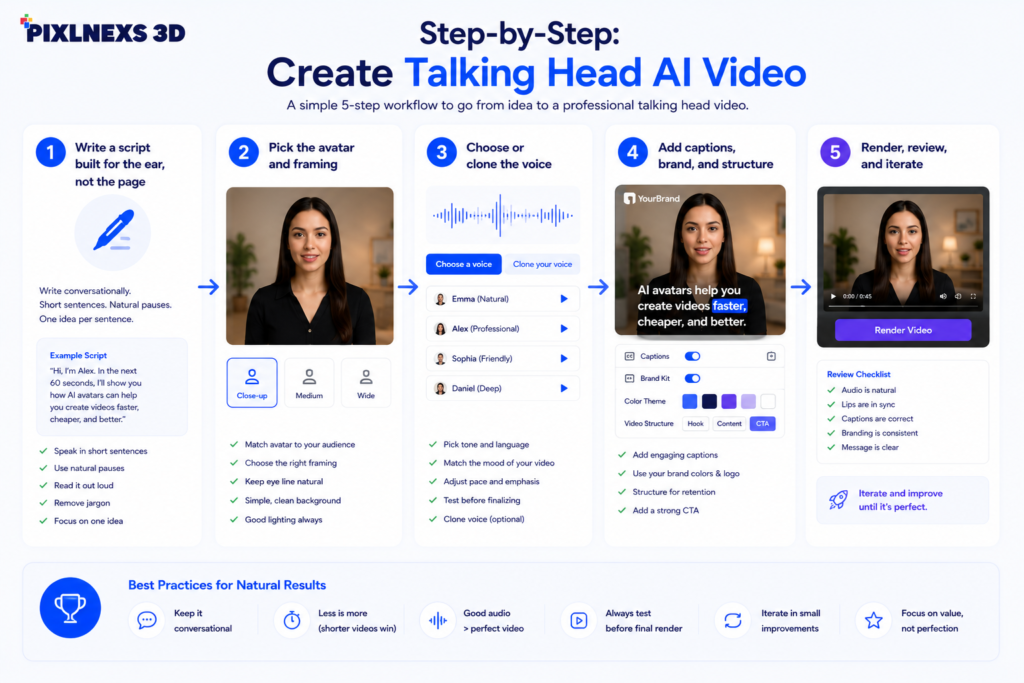
Step 1, Write a script built for the ear, not the page
This is the part that makes a difference in the result. When you hear the computer voice reading your writing you can tell away if it is good or not. You will want to keep your sentences short. You will also want to use forms like you will and it is. Read your writing loud and remove anything that is hard to say. The video should have about 130 to 150 words for each minute so a video that is 90 seconds long should have, about 200 to 230 words. When you want the computer voice to pause you can use a line break or a period because the computer voice will pause when it sees these marks.
Step 2, Pick the avatar and framing
This is the part that makes a difference in the result. When you hear the computer voice reading your writing you can tell away if it is good or not. You will want to keep your sentences short. You will also want to use forms like you will and it is. Read your writing loud and remove anything that is hard to say. The video should have about 130 to 150 words for each minute so a video that is 90 seconds long should have, about 200 to 230 words. When you want the computer voice to pause you can use a line break or a period because the computer voice will pause when it sees these marks.
Step 3, Choose or clone the voice
You have three options. Use a stock synthetic voice (pick one and adjust speed and pitch), clone a voice from a short consented recording for a branded sound, or upload your own audio and let the tool lip-sync to it. Uploading real human audio gives the most natural delivery because the emotion is genuine; the AI only has to handle the lips. If you go synthetic, spend time fixing pronunciation of names, acronyms, and product terms. Most tools let you add phonetic spellings or pronunciation overrides. Where this bites you in practice: a synthetic voice will sail through a whole paragraph perfectly and then mangle your own company name, so always do a pass listening only for proper nouns.
Step 4, Add captions, brand, and structure
Burn in captions. A large share of business video is watched on mute, and captions also help accessibility and comprehension. Add a lower-third name tag, an intro title card, and a logo bug. Drop in a B-roll cutaway or an on-screen bullet list at the moment you make a key point. This breaks the monotony of a single static face and noticeably improves retention.
Step 5, Render, review, and iterate
Make a render and view it with fresh eyes. Listen to the mistakes in pronunciation, pauses, or the movement of the lips not matching. Fix the problem in the script or the pronunciation options and render again. It’s the true super power of this form. While in filming a fix means a re-take, in this format it’s an edit that takes two minutes. Render at 1080p (or 4K, if you have it) with the same loudness on the audio track.
Tool categories compared
Rather than naming specific products that change monthly, it helps more to understand the categories. Each makes a different trade between speed, realism, and control.
| Approach | Best for | Realism | Setup effort | Watch-outs |
|---|---|---|---|---|
| Stock-avatar SaaS | Fast internal & training video | Good | Minutes | Shared faces; less brand identity |
| Custom-avatar (your likeness) | Brand spokesperson, sales | High | Hours to days | Consent recording + training time |
| Voice-upload + lip-sync | Authentic delivery | High on audio | Low–medium | Need a clean source recording |
| Full custom production (studio) | Hero/launch assets | Highest | High | Cost and turnaround |
For a deeper, vendor-by-vendor look at platforms, see our companion comparison of the best AI avatar generators for business.
Quality checklist before you publish
Lip sync: Only play once at 0.5x speed. Drift becomes more apparent when played slow.
Pronunciation: Pronunciation should be accurate for all name brand and acronyms.
Timing: Normal pauses that a human takes in between sentences no talking without pause.
Eye movement and blink rate: Avatar blinks normally and does not stare into your eyes.
Volume: Even volume with no distortions background music under 18 db when needed.
Subtitles: Precise legible and synced with the spoken word.
Disclosure: When necessary provide AI disclosure if required.
Avoiding the “uncanny valley” and other common failures
The uncanny valley, that subtle wrongness in a near-human face, is the biggest reason AI videos feel off. The fix is rarely a “better” avatar. It is better inputs. Three habits help most. First, write conversationally so the voice has natural rhythm. Second, prefer uploaded human audio over fully synthetic speech for anything emotional. Third, cut away to B-roll or graphics every 8 to 12 seconds so the viewer is not studying the face long enough to notice imperfections. The concept of the uncanny valley is well documented; see the overview on Wikipedia for background on why faces that are almost-but-not-quite human trigger unease.
Consent, likeness, and disclosure
If you copy someones voice or create a custom avatar from a person make sure you get clear written permission for that specific use. Never recreate a person or a past worker without their permission.
Many social media platforms and areas now require you to say if media is made by AI.
This is an ethics rule, not just something you do to follow the law.
When adding captions and transcripts follow the accessibility guidelines, like the W3C WCAG standards.
Where Pixlnexs fits
If you want to produce talking-head AI video at brand quality, with custom avatars, clean voice work, branded templates, and 3D assets for cutaways, that is exactly what we do. Our team builds the pipeline so you supply a script and receive a finished, on-brand clip. You can also browse production-ready 3D models for B-roll and scene dressing at store.pixlnexs.com. For the strategic picture of how talking-head video fits sales and onboarding funnels, read our guide on AI spokesperson videos for sales and onboarding.
Frequently asked questions
Related guides
- AI Avatars and Talking-Head Videos: The Complete 2026 Guide (hub)
- Best AI Avatar Generators for Business in 2026 Compared
- AI Spokesperson Videos for Sales and Onboarding That Actually Convert


Leave a Reply