
Quick answer: To import 3D model into Unreal Engine 5, drag your GLB or FBX file into the Content Browser (or use Import), then set the right options in the import dialog: import meshes and materials, generate or import collision, and either import or skip the bundled textures. FBX is the most battle-tested format for static and skeletal meshes. GLB/glTF imports natively in UE5 and carries PBR materials cleanly.
After import, check scale (Unreal uses centimeters), fix any flipped normals, assign or rebuild materials, and add collision before you drop the asset into a level. Most import problems come down to three things: wrong scale, missing textures, and bad collision. All three are fixable in minutes once you know where to look.
By the Pixlnexs Animation Studio team, we produce AI video and 3D content and run the marketplace at store.pixlnexs.com, so this reflects real production experience.
Unreal Engine 5 is one of the fussiest hosts you can hand a 3D model to. It expects correct scale, sane materials, and proper collision, and it will quietly punish a model that lacks them. The good news is that the import pipeline is forgiving once you understand what each option does. This guide walks the full process for both GLB and FBX, covers the differences that actually matter, and shows you how to fix the handful of issues that trip up almost everyone the first time they import a 3D model into Unreal Engine.
GLB vs FBX: which format should you import?
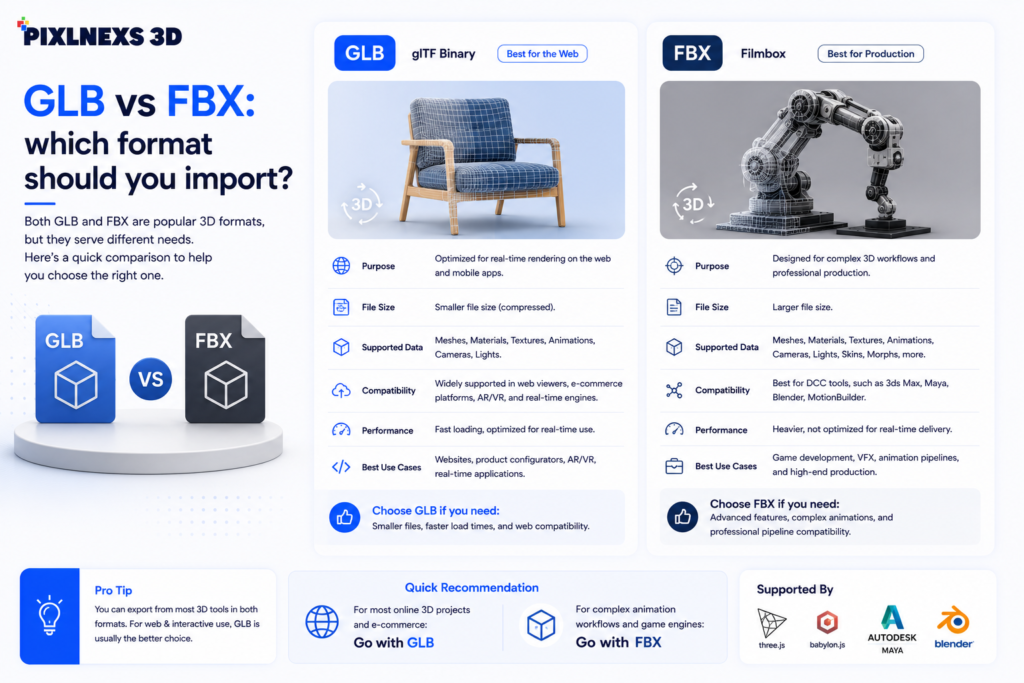
Both formats work in UE5, but they have different strengths. FBX is the long-standing industry workhorse for game engines and is the safest choice for skeletal meshes (rigged, animated characters). GLB, the binary form of glTF (the open standard from the Khronos Group), is the cleaner choice for static, PBR-textured props because it bundles geometry, materials, and textures into a single self-contained file. UE5 added native glTF import, so you no longer need a plugin for most cases.
| Factor | FBX | GLB / glTF |
|---|---|---|
| Best for | Skeletal meshes, animation, established pipelines | Static props, PBR assets, single-file delivery |
| Materials | Imports, but often needs rebuilding | PBR metallic-roughness maps in cleanly |
| Textures | Usually external files you import alongside | Embedded inside the .glb file |
| Skeletal/animation | Excellent, most reliable | Supported, less common in game workflows |
| Scale behavior | Depends heavily on source units | glTF is metric (meters) by spec |
| Self-contained | No (textures separate) | Yes (one binary file) |
Our rule of thumb: if it is a static prop, environment piece, or product model with baked PBR textures, prefer GLB. If it is a character with a skeleton and animation clips, use FBX. The Khronos glTF overview is the authoritative reference for what the format guarantees about materials and units.
Before you import: get the model ready
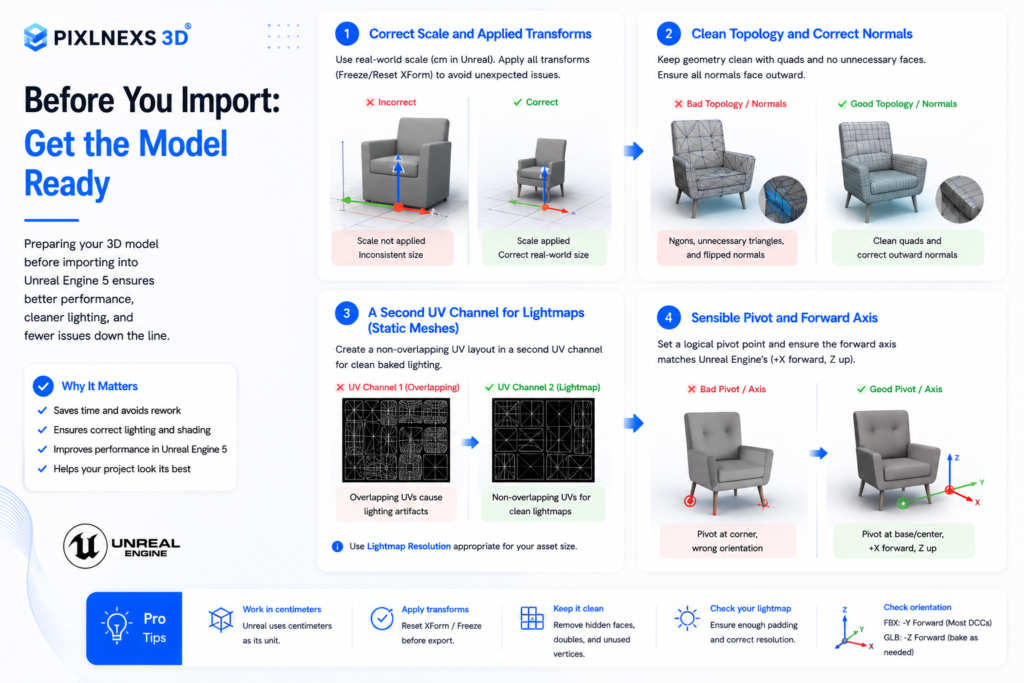
A clean import starts outside Unreal. Confirm these four things in your DCC tool (Blender, Maya, 3ds Max) before exporting.
1. Correct scale and applied transforms
Unreal works in centimeters: 1 Unreal unit = 1 cm. Blender’s default is meters, so a model exported at “1.0” can arrive 100x too small. Apply all transforms (scale, rotation, location) before exporting so the model bakes its real size into the geometry rather than carrying a hidden scale multiplier. Here’s what actually happens if you skip this: the mesh looks fine in the viewport but every child object inherits the parent’s leftover scale, and you end up chasing phantom size bugs across a whole level instead of one file.
2. Clean topology and correct normals
Flipped normals show up in UE5 as black or see-through faces once lit. Recalculate normals outside, and remove stray geometry, n-gons where you can, and overlapping faces. A model that is genuinely game-ready imports far more predictably. We cover the full checklist in our guide on what makes a 3D model game-ready.
3. A second UV channel for lightmaps (static meshes)
If you are baking static lighting, UE5 needs a second, non-overlapping UV set for lightmaps. You can let Unreal generate one at import, but a hand-authored lightmap UV almost always looks better. If you only use Lumen dynamic lighting, this matters less, though it is still good hygiene.
4. Sensible pivot and forward axis
Set the pivot/origin where it makes sense for placement, usually the base center for props or the feet for characters. Unreal is +X forward; orienting in your DCC tool first saves you rotating every instance in the level.
Step-by-step: import 3D model into Unreal Engine 5
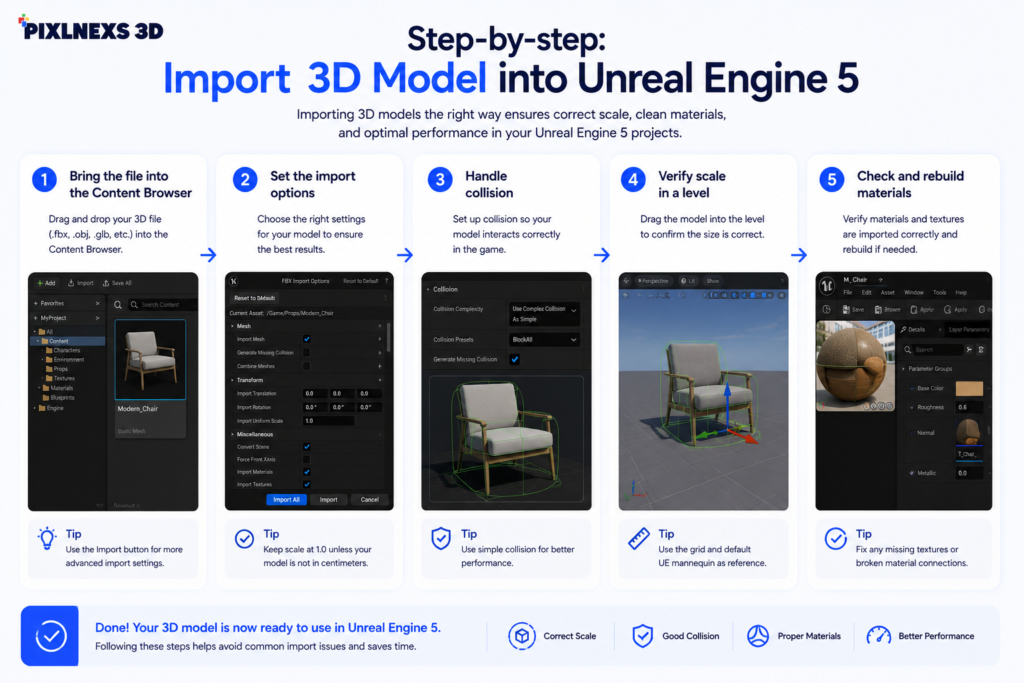
Step 1, Bring the file into the Content Browser
Drag the FBX or GLB straight from your file explorer into a folder in the Content Browser, or click Import and select the file. Keep your project organized: a dedicated folder per asset (mesh, materials, textures together) saves pain later.
Step 2, Set the import options
The import dialog is where most outcomes are decided. The settings that matter most:
- Import Mesh, on. Choose Static Mesh for props, or enable Skeletal Mesh if the model is rigged.
- Import Materials / Textures, on if you want UE5 to build materials from the file. For GLB this usually produces correct PBR materials; for FBX you may rebuild them anyway.
- Import Uniform Scale, leave at 1.0 if your export scale was correct. Use 100 only as a quick fix for a meters-based FBX that came in too small.
- Generate Lightmap UVs, on for static meshes if you did not author a lightmap UV yourself.
- Combine Meshes, on to merge separate parts into one static mesh, off to keep them as individual assets.
Step 3, Handle collision
By default an imported static mesh may have no collision, which means objects pass straight through it. In the Static Mesh Editor, use Collision > Add Box/Sphere/Convex Collision, or enable auto-convex collision generation. For complex shapes, author simple collision primitives in your DCC tool using the UCX_ naming convention so they import automatically.
Step 4, Verify scale in a level
Drag the mesh into a level next to a default Unreal mannequin or a 1m cube. This is the fastest sanity check for scale. A model that should be human-height but renders thumbnail-sized tells you instantly that units were wrong on export.
Step 5, Check and rebuild materials
Open the imported material. Confirm base color, metallic, roughness, and normal maps are connected. If textures came in flat or the normal map looks inverted, you may need to flip the green channel of the normal map (Unreal expects a specific tangent-space convention) or re-import the textures with the correct sRGB/linear settings.
Common import problems and fast fixes
The model is tiny or gigantic
Almost always a units mismatch. Re-export with applied transforms and the right export units, or set Import Uniform Scale to 100 (meters to centimeters) or 0.01 as a stopgap. Fixing it at export is cleaner than scaling every instance. The trade-off with the Import Uniform Scale shortcut: it gets you moving in the moment, but the asset now carries a non-1.0 scale that quietly confuses anyone who opens it later, including future you.
Textures are missing or grey
For FBX, the textures are usually separate files. Import them into the same folder and reconnect them in the material, or place them beside the FBX before importing so UE5 finds them. For GLB this is rare because textures are embedded; if it happens, re-export the GLB and confirm the textures were packed in.
Black or see-through faces
Flipped normals. Recalculate normals in your DCC tool and re-export. In a pinch you can enable two-sided rendering on the material, but that is a workaround, not a fix.
The normal map looks wrong (bumps look carved-in)
Unreal and some DCC tools differ on the normal map green-channel direction. Flip the green channel on the texture, or set the texture’s compression to “Normalmap” and toggle the flip option in the material node.
No collision
Add a collision primitive in the Static Mesh Editor, or import UCX_-named collision meshes from your DCC tool. Never rely on per-polygon collision for moving or frequently-hit objects, because it is expensive.
FBX vs GLB import settings at a glance
| Import option | FBX recommendation | GLB recommendation |
|---|---|---|
| Import Uniform Scale | 1.0 (or 100 if meters) | 1.0 (glTF is metric) |
| Import Materials | On, expect to rebuild | On, usually correct PBR |
| Import Textures | Place files alongside first | Embedded, no action needed |
| Generate Lightmap UVs | On if no second UV set | On if no second UV set |
| Skeletal Mesh | Enable for rigged models | Supported, less common |
If you also build for other engines, the same source assets behave a little differently elsewhere. Our companion guide on importing 3D models into Unity walks the equivalent workflow, and choosing the right detail level upfront (see low-poly vs high-poly 3D models) saves rework in both engines.
Where to get import-ready models
The fastest path to a clean import is starting with a model built to spec. Our marketplace at store.pixlnexs.com offers 3D assets with correct scale, PBR textures, and engine-friendly topology, so you spend your time building scenes instead of repairing geometry. For UE5 specifically, GLB downloads import with materials intact in a single drag.
Conclusion
Importing a 3D model into Unreal Engine 5 becomes much easier once you understand the right workflow. Choosing the correct file format, preparing your model before export, and configuring the proper import settings can save hours of troubleshooting later. Whether you’re working with a static product model, an environment asset, or an animated character, following best practices ensures your models look and perform exactly as intended.
As a general rule, GLB is the best choice for static 3D models with PBR materials because it packages everything into a single file and imports cleanly. FBX remains the preferred format for skeletal meshes, character animations, and established game development pipelines. Using the right format for your project helps avoid compatibility issues and creates a smoother workflow.
If you need high-quality, game-ready 3D assets for Unreal Engine 5, the team at Pixlnexs can help. We create optimized GLB and FBX models with clean topology, accurate scaling, efficient UVs, and production-ready PBR materials that import seamlessly into Unreal Engine. Whether you’re building a game, an architectural visualization, or a real-time product experience, we can deliver assets that are ready to use from day one.
Need custom Unreal Engine 3D models or optimized game assets? Contact Pixlnexs to discuss your project and get production-ready models built for performance and quality.
Frequently asked questions
Related guides
- Game-Ready 3D Models: What “Game-Ready” Actually Means
- How to Import 3D Models Into Unity (GLB, FBX and Best Practices)
- Low-Poly vs High-Poly 3D Models: When Each Wins
Browse render-ready 3D models for Unreal in the Pixlnexs store. Go now →
Related guide: 3D models for games, AR/VR & ecommerce.


Leave a Reply